Unity平面反射实现

项目中要做一个展示平台展示模特步,需要用到反射。因为是移动端所以SSR先被我一脚踹开了,然后因为要实时地展示所以探针也被我一脚踹开了,剩下的就是平面反射了。
基本实现
我们都知道模型要经过数次坐标空间变换,才能从模型空间到世界空间到视口空间到屏幕空间。这里也是使用了相同的原理,将平面上的模型经过变换,得到模型的倒影。

平面的点法表达形式通常为 N\cdot P +d=0。
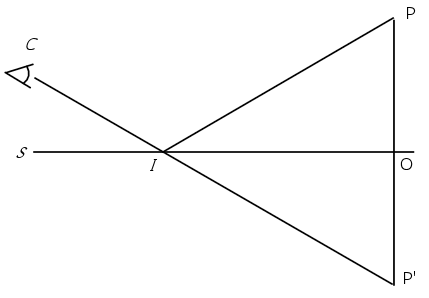
如上图所示,令某点 P 经过平面 S 反射后,虚像为 P' ,线段 \overline{PP'} 与平面相交于点 O , I 为平面上任意一点。易知 \vec {PP'} 垂直于平面 S ,其中 d 是 P 点到 S 的距离, \vec n 是 \vec{PP'} 的单位向量。
那么显然, P' 点相当于 P 点沿着法线方向 \vec n 移动了 2d 距离。
令 I=(x_0,y_0,z_0) , \vec n = (x_n,y_n,z_n) ,结合点法式的表达有:
P'=P+2d\vec n \\ P'=P+2\vec n \cdot(\vec {PI} \cdot \vec n) \\
对于 x 分量有:
x'=x+2x_n(x_n(x_0-x)+y_n(y_0-y) + z_n(z_0-z))\\ =x+2x_n(x_nx_0-x_nx+y_ny_0-y_ny+z_nz_0-z_nz)\\ =x(1-2x_n^2)-y(2y_nx_n)-z(2z_nx_n)+(2x_n^2x_0+2x_ny_ny_0+2x_nz_nz_0)
因为点法式,有 -d=x_nx_0+y_ny_0+z_nz_0 ,因此提取一下上式有:
x'=x(1-2x_n^2)-y(2y_nx_n)-z(2z_nx_n)-2x_nd\\
同理:
y'=-x(2x_ny_n)+y(1-2y_n^2)-z(2z_ny_n)-2y_nd \\ z'=-x(2x_nz_n)-y(2y_nz_n)+z(1-2z_n^2)-2z_nd \\
因此,点 P 到点 P' 的矩阵可以写成如下形式:
Matrix_{PP'}={ \left[ \begin{array}{ccc} 1-2x_n^2 & -2y_nx_n & -2z_nx_n & -2x_nd\\ -2x_ny_n & 1-2y_n^2 & -2z_ny_n & -2y_nd\\ -2x_nz_n & -2y_nz_n & 1-2z_n^2 & -2z_nd\\ 0 & 0 & 0 & 1 \end{array} \right ]}\\
在C#中,用如下函数从Camera中拿到翻转矩阵:
Matrix4x4 GetReflectMatrix(Transform trans)
{
	var result = Matrix4x4.identity;
	if (trans == null)
	return result;
	Vector3 normal = trans.up;
	float d = -Vector3.Dot(normal, trans.position);
	var x2 = normal.x * normal.x;
	var y2 = normal.y * normal.y;
	var z2 = normal.z * normal.z;
	var xy2 = -2 * normal.x * normal.y;
	var xz2 = -2 * normal.x * normal.z;
	var yz2 = -2 * normal.y * normal.z;

	result.m00 = 1 - x2;
	result.m11 = 1 - y2;
	result.m22 = 1 - z2;

	result.m01 = xy2;
	result.m02 = xz2;
	result.m10 = xy2;
	result.m12 = yz2;
	result.m20 = xz2;
	result.m21 = yz2;

	result.m03 = -2 * d * normal.x;
	result.m13 = -2 * d * normal.y;
	result.m23 = -2 * d * normal.z;
	return result;
}
使用方法:
using System.Collections;
using System.Collections.Generic;
using UnityEngine;
using Loader;
using UnityEngine.UI;
using UnityEngine.EventSystems;

public enum ImageWidth
{
    _64 = 64,
    _128 = 128,
    _256 = 256,
    _512 = 512,
    _1024 = 1024,
}

[ExecuteInEditMode]
public class NewBehaviourScript : MonoBehaviour
{
    [SerializeField]
    private ImageWidth imageWidth = ImageWidth._1024;
    private Camera camera;
    private RenderTexture reflectImage;
    private Material material;
    public Camera SourceCamera;
    public static NewBehaviourScript AddPlanarReflect(GameObject go, Camera camera)
    {
        if (go == null || camera == null)
            return null;
        var result = go.AddComponent<NewBehaviourScript>();
        result.enabled = false;
        result.SourceCamera = camera;
        result.enabled = true;
        return result;
    }
    #region Mono
    private void OnEnable()
    {
        if (camera == null)
        {
            var trans = transform.Find("Reflect Camera");
            GameObject go;
            if (trans == null)
                go = new GameObject("Reflect Camera");
            else
                go = trans.gameObject;
            go.transform.SetParent(transform);
            camera = go.GetComponent<Camera>();
            if (camera == null)
                camera = go.AddComponent<Camera>();
            camera.CopyFrom(SourceCamera);
        }
        //申请RT
        if (reflectImage != null)
            RenderTexture.ReleaseTemporary(reflectImage);
        int width = (int)imageWidth;
        reflectImage = RenderTexture.GetTemporary(width, (int)(width / camera.aspect), 24);
        camera.targetTexture = reflectImage;
    }

    private void OnDisable()
    {
        if (camera != null)
        {
            camera.enabled = false;
        }
    }

    private void OnDestroy()
    {
        if (reflectImage != null)
            RenderTexture.ReleaseTemporary(reflectImage);
    }

    /// <summary>
    /// 即将被渲染时执行
    /// </summary>
    private void OnWillRenderObject()
    {
        if (camera == null || reflectImage == null)
            return;
        //需要实时同步相机的参数,比如编辑器下滚动滚轮,Editor相机的远近裁剪面就会变化
        UpdateCamearaParams(SourceCamera, camera);
        camera.enabled = false;
        //获取翻转矩阵
        var matrix = GetReflectMatrix(transform);
        camera.worldToCameraMatrix = SourceCamera.worldToCameraMatrix * matrix;
        camera.transform.position = matrix.MultiplyPoint(SourceCamera.transform.position);
        //绕序反向,需要将裁剪翻转
        GL.invertCulling = !GL.invertCulling;
        camera.Render();
        if (material == null)
            material = GetComponent<Renderer>().material;
        material.SetTexture("_ReflectImage", reflectImage);
        GL.invertCulling = !GL.invertCulling;
    }
    #endregion


    Matrix4x4 GetReflectMatrix(Transform trans)
    {
        var result = Matrix4x4.identity;
        if (trans == null)
            return result;
        Vector3 normal = trans.up;
        float d = -Vector3.Dot(normal, trans.position);
        var x2 = 2 * normal.x * normal.x;
        var y2 = 2 * normal.y * normal.y;
        var z2 = 2 * normal.z * normal.z;
        var xy2 = -2 * normal.x * normal.y;
        var xz2 = -2 * normal.x * normal.z;
        var yz2 = -2 * normal.y * normal.z;

        result.m00 = 1 - x2;
        result.m11 = 1 - y2;
        result.m22 = 1 - z2;

        result.m01 = xy2;
        result.m02 = xz2;
        result.m10 = xy2;
        result.m12 = yz2;
        result.m20 = xz2;
        result.m21 = yz2;

        result.m03 = -2 * d * normal.x;
        result.m13 = -2 * d * normal.y;
        result.m23 = -2 * d * normal.z;
        return result;
    }

    /// <summary>
    /// 同步camera参数
    /// </summary>
    /// <param name="srcCamera"></param>
    /// <param name="destCamera"></param>
    private void UpdateCamearaParams(Camera srcCamera, Camera destCamera)
    {
        if (destCamera == null || srcCamera == null)
            return;

        destCamera.clearFlags = srcCamera.clearFlags;
        destCamera.backgroundColor = srcCamera.backgroundColor;
        destCamera.farClipPlane = srcCamera.farClipPlane;
        destCamera.nearClipPlane = srcCamera.nearClipPlane;
        destCamera.orthographic = srcCamera.orthographic;
        destCamera.fieldOfView = srcCamera.fieldOfView;
        destCamera.aspect = srcCamera.aspect;
        destCamera.orthographicSize = srcCamera.orthographicSize;
    }
}
Shader里使用也很简单,因为拍摄到的像是这样的:
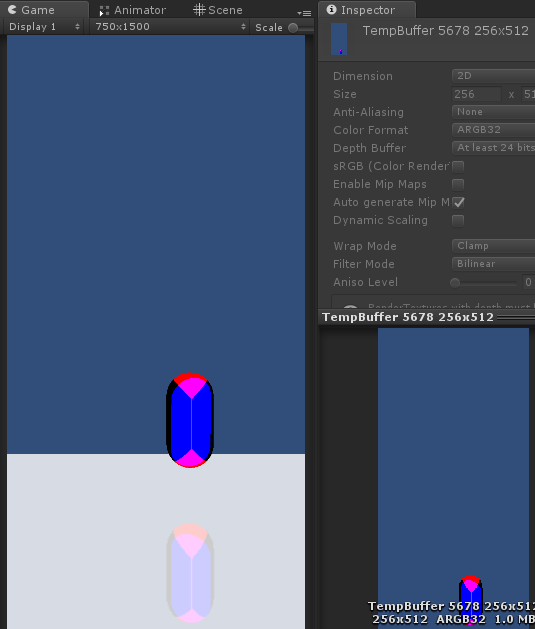

因此Shader里只要像后处理或者是GrabPass一样用ComputeScreenPos就行:
v2f vert (appdata v)
{
	...
	o.screenPos = ComputeScreenPos(o.vertex);
	...
}

fixed4 frag (v2f i) : SV_Target
{
	...
	fixed4 reflect = tex2Dproj(_ReflectImage, i.screenPos);
	...
}
斜截视锥体
这里有个问题,就是,在相机NearPlane和平面之间的物体也会被拍摄进去,导致虚像未被平面截断的问题,如下图所示,红色部分不应被拍摄:
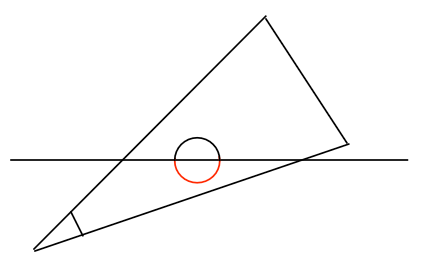

因此,我们需要使用平面而不是相机的原本NearPlane作为近截面,将先前的平顶视锥体斜截。这一步发生在世界坐标空间向视口空间变换的过程中。
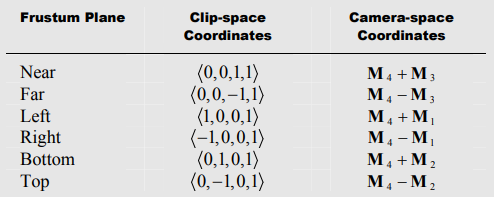

由上图可知,若要使用一个新的截面取代Near作为近截面,则也要满足如下式子:
\bold N'=\bold M_4+\bold M_3 \\
投影矩阵的 \bold M_4 通常用来将z分量取反移动到w分量,对于正确校正顶点属性(例如纹理坐标)的插值是必需的,所以我们要修改的是 \bold M_3 行。令新的近截面为 \bold N' 则有:
\bold M_3'=\bold N'-\bold M_4 \\ \bold F'=\bold M_4-\bold M_3'\\ \bold F'=2\bold M_4-\bold N'
但这里有个问题,就是 \bold N' 不一定平行于 \bold F ,导致修改 \bold M_3 之后远截面也可能会变化,或许截断了原先的视锥体,导致本该显示的地方被裁剪;或许远离原先的视锥体,导致深度信息发生剧烈变化;这是不可避免的,但幸运的是我们可以将这种影响最小化,使近截面和远截面的角度尽可能小。因此我们需要计算适当的比例,以最小化 \bold N' 和 \bold F' 之间的角度,而不会剪切原始视锥的任何部分,这一调整就在于对 \bold F’ 做一个比例缩放。
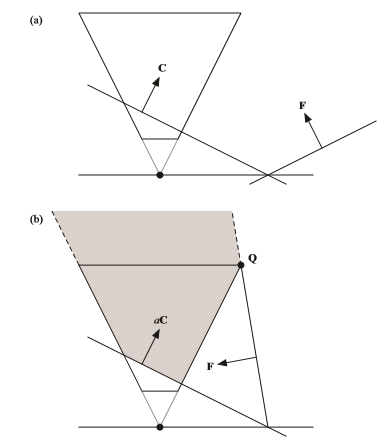
令 \bold N'=(\bold M^{-1})^T\bold N ,即新的近截面使用原始投影矩阵后在视口空间的投影。则 \bold F' 所对应的远截面坐标边界为:
\bold Q'=\left< sgn(N'_x), sgn(N'_y), 1,1 \right > \\
边界处的 x 和 y 分量的符号,取决于 \bold N' 的朝向。绝大多数情况下我们可以安全的假定投影变换不会改变符号,因此坐标边界直接取视口空间内 \bold N' 平面的坐标符号。有了坐标边界,我们就乘以投影矩阵的逆矩阵变换回视口空间的 \bold Q , \bold Q 为 \bold F' 上的一点:
\bold Q=\bold M^{-1}\bold Q'\\
为了达到保留视锥体的目的, \bold Q 应当与原视锥体中距离平面 \bold N' 最远的那点重合;换句话说, \bold Q 既在原远截面 \bold F 上,又在新远截面 \bold F' 上:
\bold F=2\bold M_4-a\bold N' \\
又因为点法式 \bold F \cdot\bold Q=0 ,所以式子两边可乘以 \bold Q 最后有:
a=\frac{2\bold M_4\cdot \bold Q}{\bold N'\cdot \bold Q}\\ \bold M_3' = a\bold N'-\bold M_4
OpenGL中标准透视投影矩阵 \bold M 和逆矩阵 \bold M^{-1} 如下:

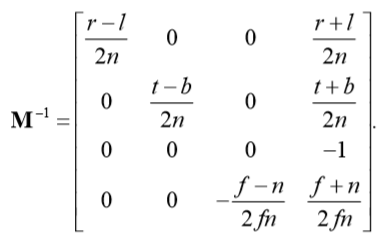
因为 a=\frac{2\bold M_4\cdot \bold M^{-1} \cdot \bold Q'}{\bold N'\cdot \bold M^{-1}\cdot \bold Q'} , \bold M^{-1}_3 仅有 w 分量非零,因此只看 \bold Q' 的 z 项即可,又因为, \bold M_4 只有 z 分量非零,所以项 \bold M_4 \cdot \bold Q=1 。实际式子可写为:
a=\frac{2}{\bold N' \cdot \bold Q}\\
有了 a ,带入回 \bold M_3' = a\bold N'-\bold M_4 即可求出 \bold M_3 。
//计算斜截矩阵
Matrix4x4 GetObliqueMatrix(Vector4 plane)
{
	var M = camera.projectionMatrix;
	// 因为是协变向量,需要逆转置来变换,
	// N'
	var newN = camera.worldToCameraMatrix.inverse.transpose * plane;
	// Q'
	var qInClipSpace = new Vector4(Mathf.Sign(newN.x), Mathf.Sign(newN.y), 1, 1);
	var qInViewSpace = camera.projectionMatrix.inverse * qInClipSpace;
	// 求a
	var a = 2f / Vector4.Dot(newN, qInViewSpace);
	var m4 = new Vector4(M.m30, M.m31, M.m32, M.m33);
	var a_newN = a * newN;
	// m'_3
	var newM_3 = a_newN - m4;
	M.m20 = newM_3.x;
	M.m21 = newM_3.y;
	M.m22 = newM_3.z;
	M.m23 = newM_3.w;
	return M;
	// Unity API
	//var viewSpacePlane = camera.worldToCameraMatrix.inverse.transpose * plane;
	//return camera.CalculateObliqueMatrix(viewSpacePlane);
}
这里走了不少弯路,最蛋疼的地方就是
var a = 2f/ Vector4.Dot(newN, qInViewSpace);
错把裁剪空间的 \bold Q' 传了进去,结果对了半天论文和别人的实现……
模糊
从UnityShadowLibaray.cginc里扒了3x3和5x5两种卷积核的模糊:
fixed4 PCF3X3Gaussian(float4 texel, sampler2D image, float2 uv, float dist)
{
	float2 st = frac(uv);
	float2 uw = float2(3 - 2 * st.x, 1 + 2 * st.x);
	float2 u = float2((2 - st.x) / uw.x - 1, (st.x) / uw.y + 1) * dist;
	u *= texel.x;

	float2 vw = float2(3 - 2 * st.y, 1 + 2 * st.y);
	float2 v = float2((2 - st.y) / vw.x - 1, (st.y) / vw.y + 1) * dist;
	v *= texel.y;

	fixed4 result = fixed4(0, 0, 0, 0);
	result += uw[0] * vw[0] * tex2D(image, uv + float2(u[0], v[0]));
	result += uw[1] * vw[0] * tex2D(image, uv + float2(u[1], v[0]));
	result += uw[0] * vw[1] * tex2D(image, uv + float2(u[0], v[1]));
	result += uw[1] * vw[1] * tex2D(image, uv + float2(u[1], v[1]));
	result /= 16.0;
	return result;
}

fixed4 PCF5X5Gaussian(float4 texel, sampler2D image, float2 uv, float dist)
{
	float2 st = frac(uv);
	float3 uw = float3(4 - 3 * st.x, 7, 1 + 3 * st.x);
	float3 u = float3((3 - 2 * st.x) / uw.x - 2, (3 + st.x) / uw.y, st.x / uw.z + 2) * dist;
	u *= texel.x;

	float3 vw = float3(4 - 3 * st.y, 7, 1 + 3 * st.y);
	float3 v = float3((3 - 2 * st.y) / vw.x - 2, (3 + st.y) / vw.y, st.y / vw.z + 2) * dist;
	v *= texel.y;

	fixed4 result = fixed4(0, 0, 0, 0);
	half3 accum = uw * vw.x;
	result += accum.x * tex2D(image, uv + float2(u.x, v.x));
	result += accum.y * tex2D(image, uv + float2(u.y, v.x));
	result += accum.z * tex2D(image, uv + float2(u.z, v.x));

	accum = uw * vw.y;
	result += accum.x * tex2D(image, uv + float2(u.x, v.y));
	result += accum.y * tex2D(image, uv + float2(u.y, v.y));
	result += accum.z * tex2D(image, uv + float2(u.z, v.y));

	accum = uw * vw.z;
	result += accum.x * tex2D(image, uv + float2(u.x, v.z));
	result += accum.y * tex2D(image, uv + float2(u.y, v.z));
	result += accum.z * tex2D(image, uv + float2(u.z, v.z));
	result /= 144.0;
	return result;
}

为了控制模糊的效果,引入一个粗糙度和噪声图,在原始效果和模糊后的效果之间做个Lerp:
// Glitter
fixed glitter = tex2D(_GlitterImage, i.guv).x;
glitter = pow(glitter, _Roughness);
// Blur
fixed4 reflectBlured = PCF5X5Gaussian(_ReflectImage_TexelSize, _ReflectImage, uv, _BlurDistance);
fixed4 reflectOrigin = tex2D(_ReflectImage, uv);
fixed4 reflect = lerp(reflectBlured, reflectOrigin, glitter);

菲涅尔
扒出了当时做水体渲染的代码:
#region 菲涅尔预计算
[SerializeField]
Texture2D fresnelLookupTex;
void FresnelInit()
{
	fresnelLookupTex = new Texture2D(512, 1, TextureFormat.RFloat, false);
	float t = 1f / 511f;
	for (int i = 0; i < 512; i++)
	{
		float costheta = i * t;
		float schilick = Schilick(costheta);
		fresnelLookupTex.SetPixel(i, 0, new Color(schilick, 0, 0, 1));
	}
	fresnelLookupTex.Apply();
}

// Schilick近似:R(\theta)=R(0)+(1-R(0))(1-cos\theta_i)^5
float Schilick(float cost)
{
	float water_n = 1.333f;
	float R0 = (1 - water_n) / (1 + water_n);
	R0 *= R0;
	return R0 + (1 - R0) * Mathf.Pow(1 - cost, 5);
}
#endregion
Shader:
// Fresnel
float3 n = normalize(i.normal);
float3 v = normalize(UnityWorldSpaceViewDir(i.worldPos));
float costheta = dot(n, v);
float fresnel = tex2D(_FresnelImage, float2(costheta , 0)).r;
最后,其实我还想加入倒影的深度图的,但是奇怪的是像这样设置了targetTexture、修改了投影矩阵之后手动触发的Render(),使用Graphics.Blit似乎没什么卵用,查了一下也没有头绪,还请大手子们赐教。
参考资料
【1】https://blog.csdn.net/puppet_master/article/details/80808486