
Filament解析1·主体逻辑


从这篇文章开始我将开始记录剖析Filament的过程。因为之前剖析OGRE有一定的经验了,所以有些地方我会直接打断点,而不解释为什么会找到这个位置。我们首先来看绘制三角形的范例,hellotriangle,总体的设置和题图的Blender猴头是类似的,只是还用不到复杂的材质系统而已,相比较OGRE,以下这段代码非常清爽:
    App app;
    auto setup = [&app](Engine* engine, View* view, Scene* scene) {
        app.skybox = Skybox::Builder().color({0.1, 0.125, 0.25, 1.0}).build(*engine);
        scene->setSkybox(app.skybox);
        view->setPostProcessingEnabled(false);
        static_assert(sizeof(Vertex) == 12, "Strange vertex size.");
        app.vb = VertexBuffer::Builder()
        .vertexCount(3)
        .bufferCount(1)
        .attribute(VertexAttribute::POSITION, 0, VertexBuffer::AttributeType::FLOAT2, 0, 12)
        .attribute(VertexAttribute::COLOR, 0, VertexBuffer::AttributeType::UBYTE4, 8, 12)
        .normalized(VertexAttribute::COLOR)
        .build(*engine);
        app.vb->setBufferAt(*engine, 0,
                            VertexBuffer::BufferDescriptor(TRIANGLE_VERTICES, 36, nullptr));
        app.ib = IndexBuffer::Builder()
        .indexCount(3)
        .bufferType(IndexBuffer::IndexType::USHORT)
        .build(*engine);
        app.ib->setBuffer(*engine,
                          IndexBuffer::BufferDescriptor(TRIANGLE_INDICES, 6, nullptr));
        app.mat = Material::Builder()
        .package(RESOURCES_BAKEDCOLOR_DATA, RESOURCES_BAKEDCOLOR_SIZE)
        .build(*engine);
        app.renderable = EntityManager::get().create();
        RenderableManager::Builder(1)
        .boundingBox({{ -1, -1, -1 }, { 1, 1, 1 }})
        .material(0, app.mat->getDefaultInstance())
        .geometry(0, RenderableManager::PrimitiveType::TRIANGLES, app.vb, app.ib, 0, 3)
        .culling(false)
        .receiveShadows(false)
        .castShadows(false)
        .build(*engine, app.renderable);
        scene->addEntity(app.renderable);
        app.cam = engine->createCamera();
        view->setCamera(app.cam);
    };

    auto cleanup = [&app](Engine* engine, View*, Scene*) {
        engine->destroy(app.skybox);
        engine->destroy(app.renderable);
        engine->destroy(app.mat);
        engine->destroy(app.vb);
        engine->destroy(app.ib);
        engine->destroy(app.cam);
    };

    FilamentApp::get().animate([&app](Engine* engine, View* view, double now) {
        constexpr float ZOOM = 1.5f;
        const uint32_t w = view->getViewport().width;
        const uint32_t h = view->getViewport().height;
        const float aspect = (float) w / h;
        app.cam->setProjection(Camera::Projection::ORTHO,
                               -aspect * ZOOM, aspect * ZOOM,
                               -ZOOM, ZOOM, 0, 1);
        auto& tcm = engine->getTransformManager();
        tcm.setTransform(tcm.getInstance(app.renderable),
                         filament::math::mat4f::rotation(now, filament::math::float3{ 0, 0, 1 }));
    });

    FilamentApp::get().run(config, setup, cleanup);
总的来说,FilamentApp的run函数需要三个配置,一个config选择backend,setup设置场景(类似OGRE范例中的createScene),cleanup表示析构。同是animate函数也接受一个匿名函数,以更新场景中的对象。
我们直接进入到run:
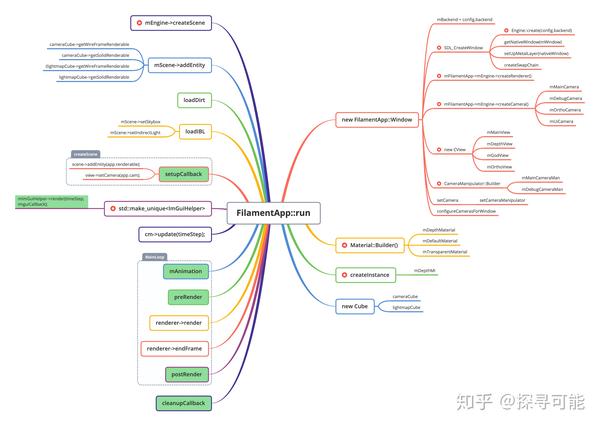
run函数接受几个回调的函数对象:
    void run(const Config& config, SetupCallback setup, CleanupCallback cleanup,
             ImGuiCallback imgui = ImGuiCallback(), PreRenderCallback preRender = PreRenderCallback(),
             PostRenderCallback postRender = PostRenderCallback(),
             size_t width = 1024, size_t height = 640)
在上面的思维导图中,这些对象用绿色标注,主要的逻辑分为三个部分:
- 创建一堆的对象(类似OGRE中的入口类Root的工作)
- setupCallback构造场景
- 进入主循环,SDL接受窗口事件,然后调用mAnimation更新动画,接着进入preRender函数,并且调用render,最后调用postRender
那最关键的当然是render:
void FRenderer::render(FView const* view) {
    SYSTRACE_CALL();

    assert(mSwapChain);

    if (mBeginFrameInternal) {
        mBeginFrameInternal();
        mBeginFrameInternal = {};
    }

    if (UTILS_LIKELY(view && view->getScene())) {
        // per-renderpass data
        ArenaScope rootArena(mPerRenderPassArena);

        FEngine& engine = mEngine;
        JobSystem& js = engine.getJobSystem();

        // create a master job so no other job can escape
        auto masterJob = js.setMasterJob(js.createJob());

        // execute the render pass
        renderJob(rootArena, const_cast<FView&>(*view));

        // make sure to flush the command buffer
        engine.flush();

        // and wait for all jobs to finish as a safety (this should be a no-op)
        js.runAndWait(masterJob);
    }
}
这个函数中就有意思了:
- JobSystem可以理解为一个并行处理中心,首先调用js.setMasterJob(js.createJob())构造一个父节点,这个节点不做任何事情,只是为了后面创建工作的时候可以被绑定在这个job上,从而避免任务的遗漏。
- renderJob是这里的主函数
- engine.flush()会唤醒一个线程执行Engine::Loop,刷新任务队列
- js.runAndWait(masterJob)则完成所有的Job工作
FRenderer::renderJob的结构如下:
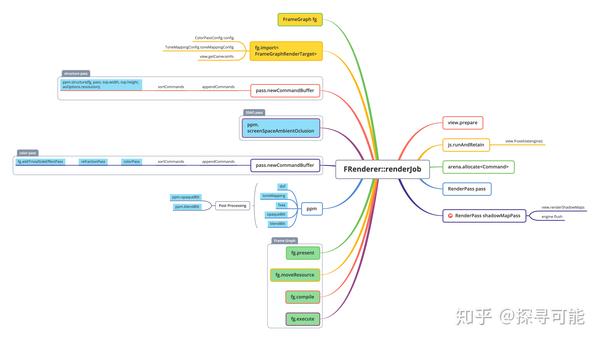
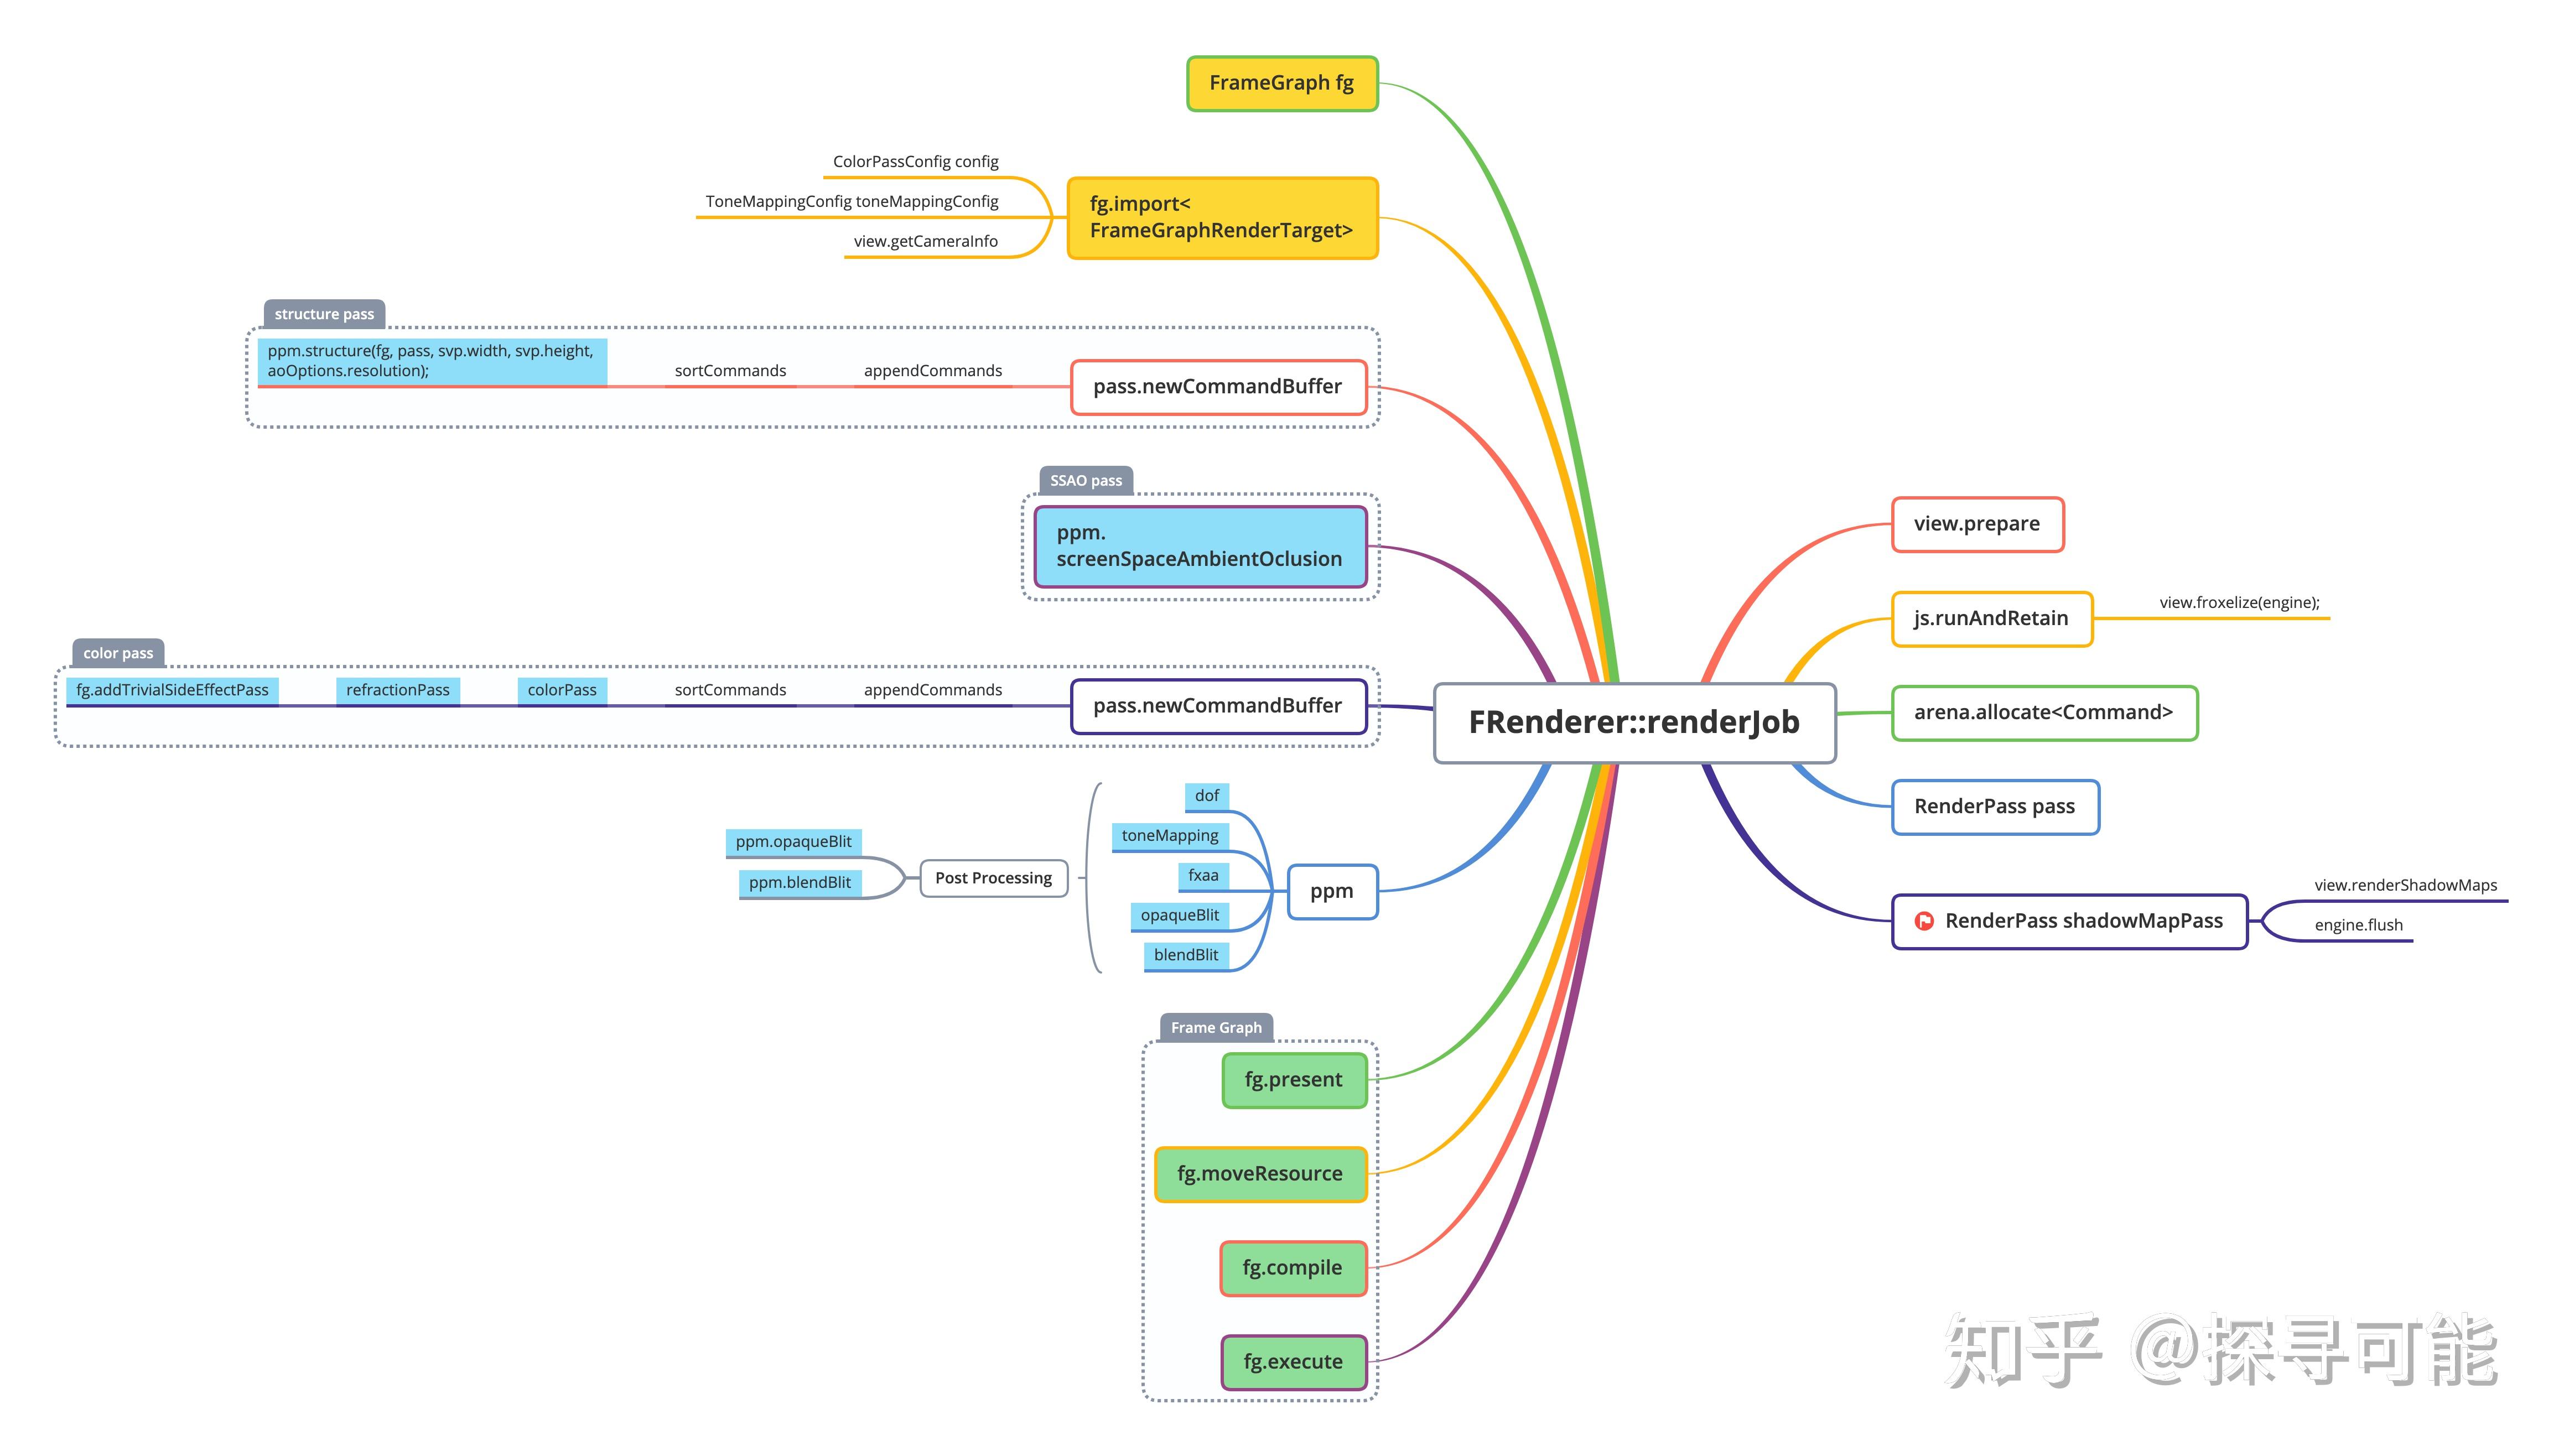
renderJob主要会和Frame Graph产生一个交互,Frame Graph大家暂时不理解也无所谓,可以就认为是一个组织渲染流程的任务系统。我找了一个最简单的函数来展示Frame Graph的基本使用:
    auto& ppFXAA = fg.addPass<PostProcessFXAA>("fxaa",
                                               [&](FrameGraph::Builder& builder, auto& data) {
        auto const& inputDesc = fg.getDescriptor(input);
        data.input = builder.sample(input);
        data.output = builder.createTexture("fxaa output", {
            .width = inputDesc.width,
            .height = inputDesc.height,
            .format = outFormat
        });
        data.output = builder.write(data.output);
        data.rt = builder.createRenderTarget("FXAA Target", {
            .attachments = { data.output } });
    },
                                               [=](FrameGraphPassResources const& resources,
                                                   auto const& data, DriverApi& driver) {
        auto const& texture = resources.getTexture(data.input);

        FMaterialInstance* mi = mFxaa.getMaterialInstance();
        mi->setParameter("colorBuffer", texture, {
            .filterMag = SamplerMagFilter::LINEAR,
            .filterMin = SamplerMinFilter::LINEAR
        });

        mi->commit(driver);
        mi->use(driver);

        const uint8_t variant = uint8_t(translucent ?
                                        PostProcessVariant::TRANSLUCENT : PostProcessVariant::OPAQUE);

        auto const& target = resources.get(data.rt);
        driver.beginRenderPass(target.target, target.params);
        driver.draw(mFxaa.getPipelineState(variant), fullScreenRenderPrimitive);
        driver.endRenderPass();
    });
这个函数是后处理当中找的,简单来说,fg(frame graph)通过一个模板函数addPass,保持两个函数对象:
/*
* Add a pass to the framegraph.
* The Setup lambda is called synchronously and used to declare which and how resources are
*   used by this pass. Captures should be done by reference.
* The Execute lambda is called asynchronously from FrameGraph::execute(), and this is where
*   immediate drawing commands can be issued. Captures must be done by copy.
*/
template <typename Data, typename Setup, typename Execute>
FrameGraphPass<Data, Execute>& addPass(const char* name, Setup setup, Execute&& execute)
函数当中setup同步执行,execute异步执行,由此FrameGraph保存了Pass的全部信息。所以大家可以搜索一下addPass,就知道Filament到底内置了多少种渲染配置。我们回到上面的那张思维导图,图中蓝色标准的全部都是Pass的设置,实质上都调用了addPass,移植到最后绿色标记的部分:
    fg.present(output);
    fg.moveResource(fgViewRenderTarget, output);
    fg.compile();
    //fg.export_graphviz(slog.d);
    fg.execute(engine, driver);
frame graph会调用上面配置的各个pass,先配置资源,然后execute执行。这里还有一个辅助的export_graphviz用于打印出frame graph的结构。
循环结构
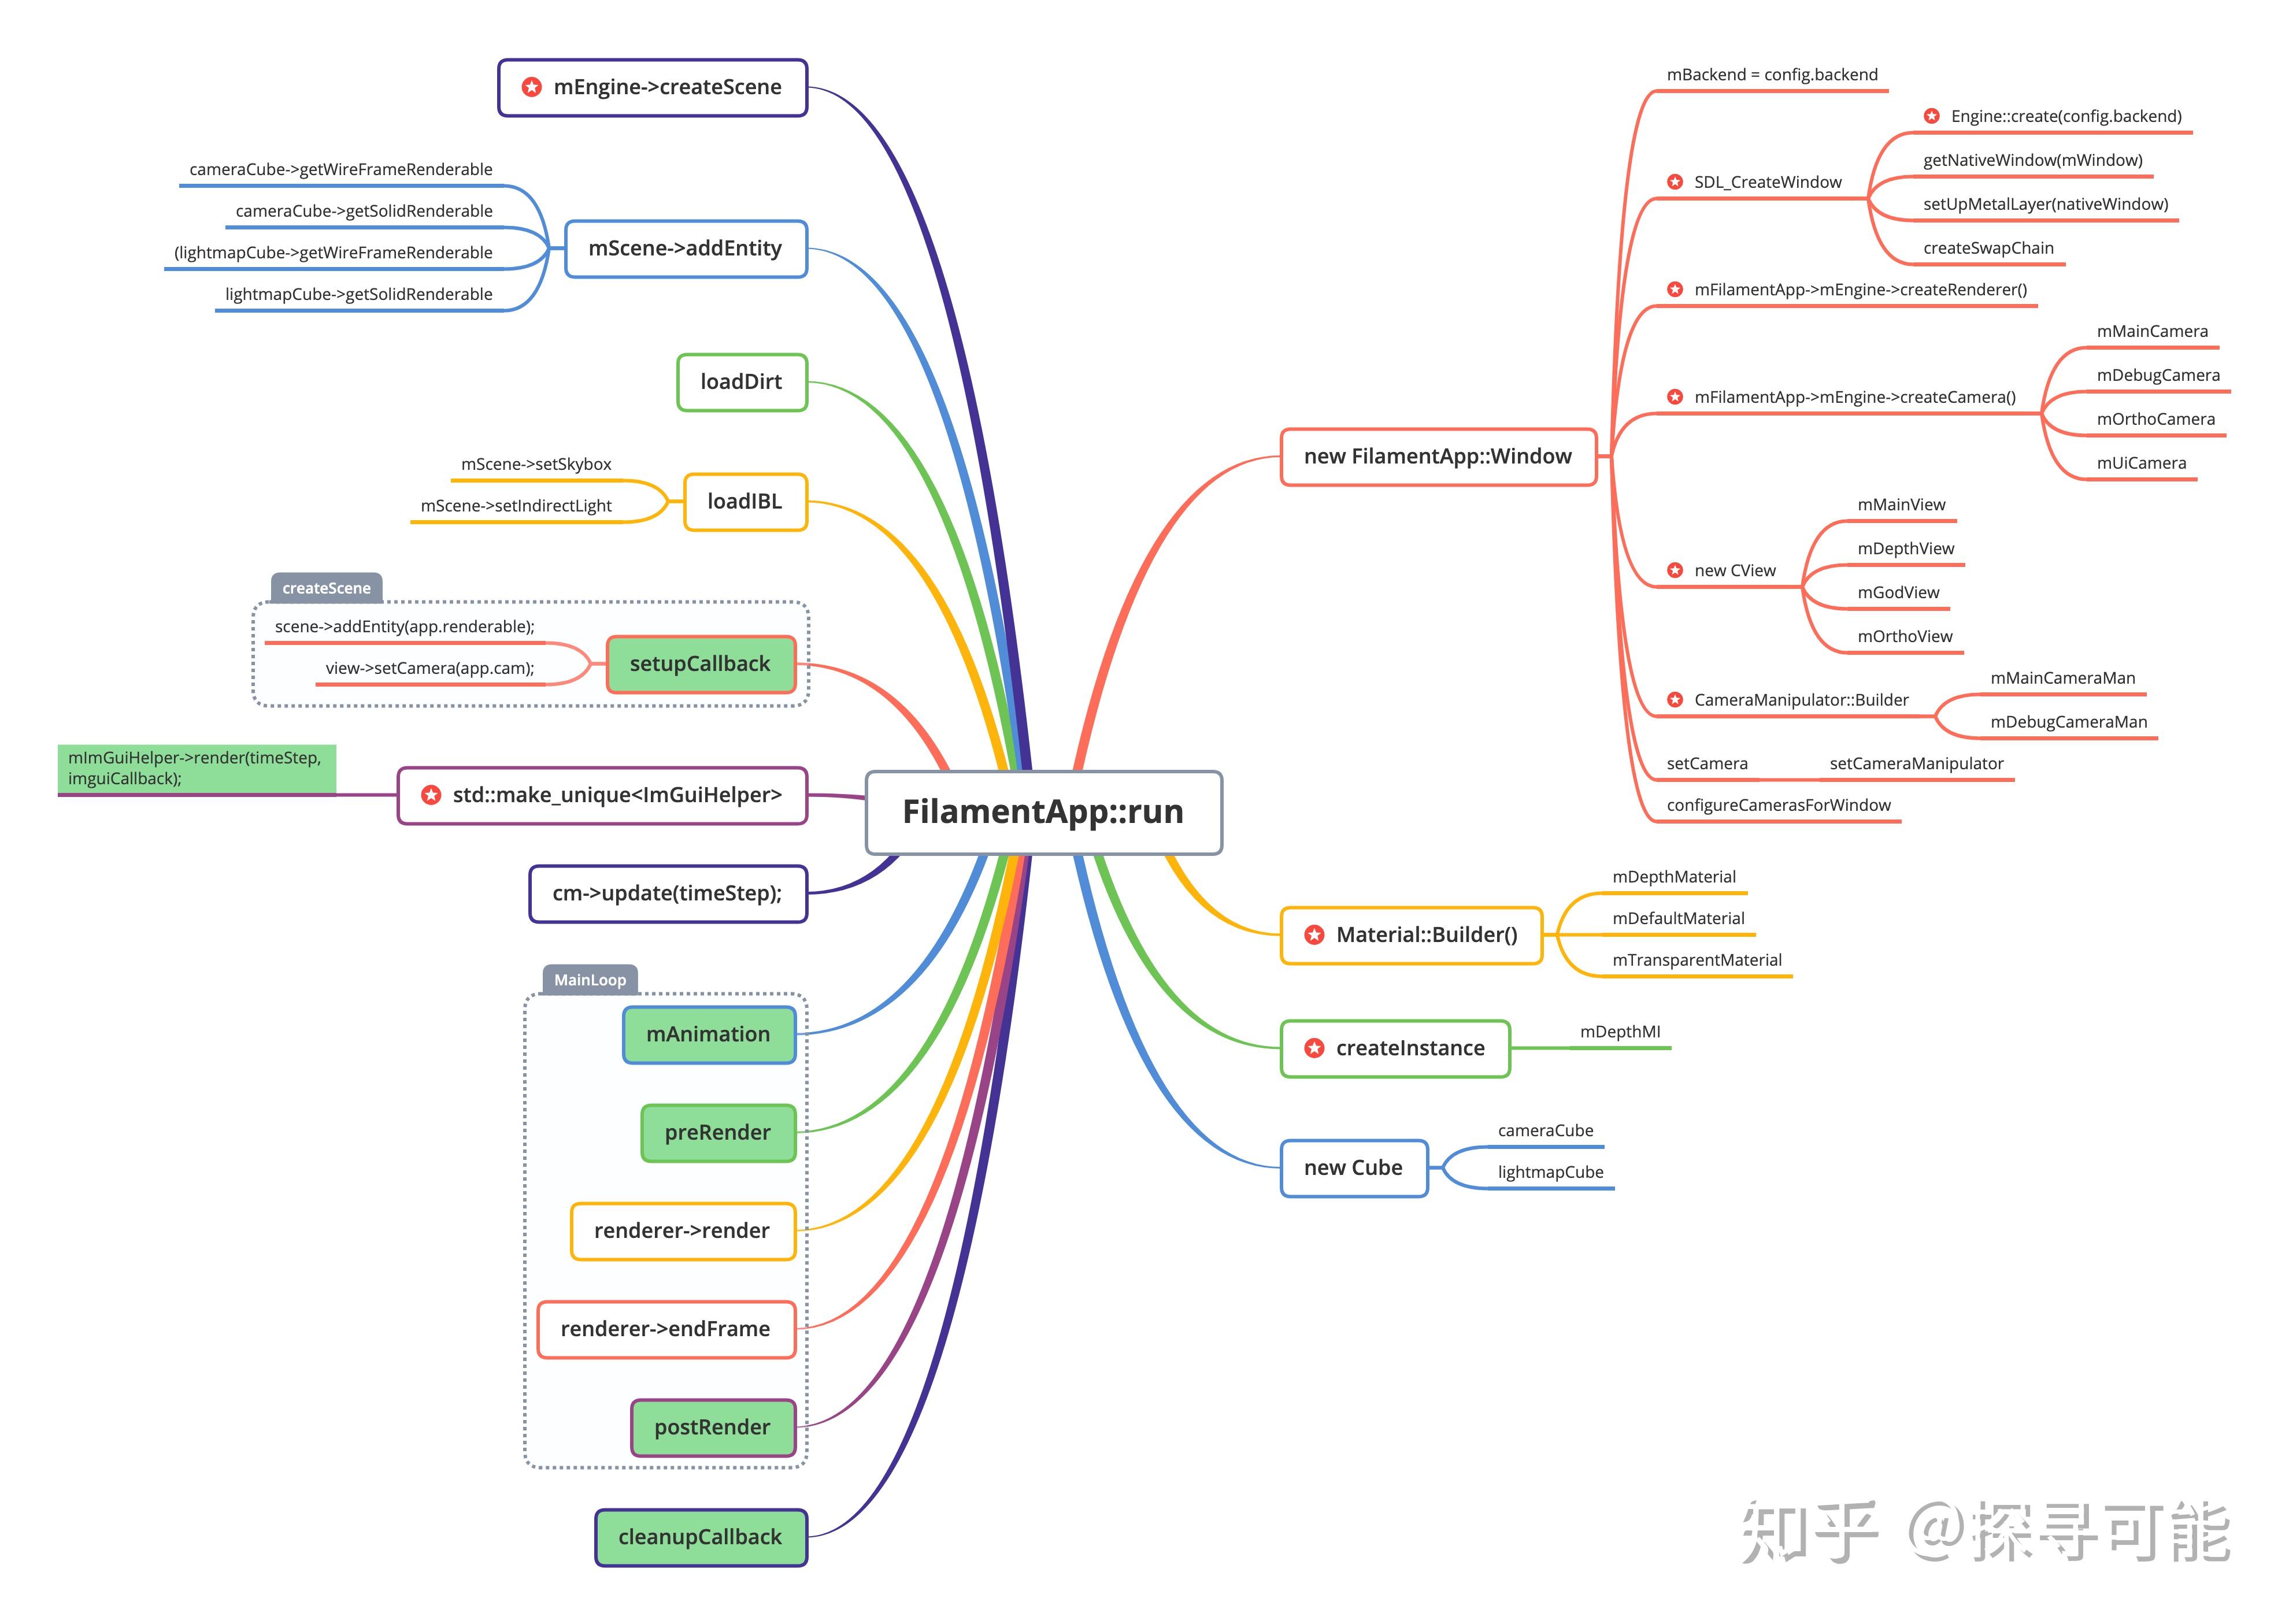
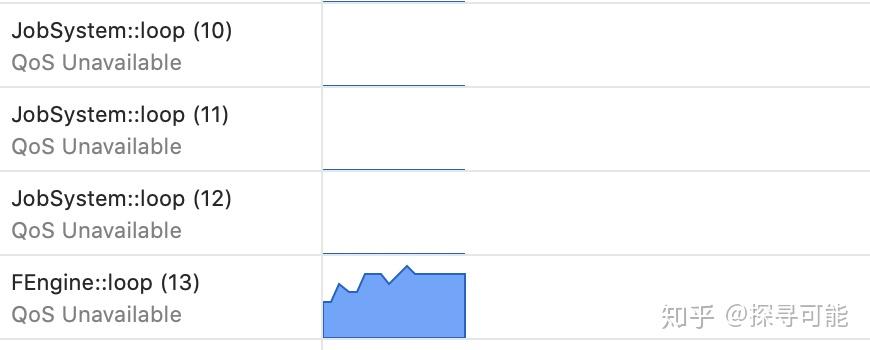
上面这部分其实就是主线程的逻辑。再往下就要进入到engine::flush,看一看这些pass如何最后被转化为Metal的命令的。但说下去就有点长,我先就此打住,从另外一个方面来看一下代码,即线程。我的电脑是MacBook Pro (13-inch, 2018, Four Thunderbolt 3 Ports),四核。从运行后台可以看到Filament有四个辅助线程:

通过搜索std::thread(,我们可以找到这些线程的启动位置。首先来看前三个,我们来到JobSystem::JobSystem:
    for (size_t i = 0, n = states.size(); i < n; i++) {
        auto& state = states[i];
        state.rndGen = default_random_engine(rd());
        state.id = (uint32_t)i;
        state.js = this;
        if (i < hardwareThreadCount) {
            // don't start a thread of adoptable thread slots
            state.thread = std::thread(&JobSystem::loop, this, &state);
        }
    }
JobSystem::loop是该线程的主体函数,会调用execute:
void JobSystem::loop(ThreadState* state) noexcept {
    setThreadName("JobSystem::loop");
    setThreadPriority(Priority::DISPLAY);

    // set a CPU affinity on each of our JobSystem thread to prevent them from jumping from core
    // to core. On Android, it looks like the affinity needs to be reset from time to time.
    setThreadAffinityById(state->id);

    // record our work queue
    mThreadMapLock.lock();
    bool inserted = mThreadMap.emplace(std::this_thread::get_id(), state).second;
    mThreadMapLock.unlock();
    ASSERT_PRECONDITION(inserted, "This thread is already in a loop.");

    // run our main loop...
    do {
        if (!execute(*state)) {
            std::unique_lock<Mutex> lock(mWaiterLock);
            while (!exitRequested() && !hasActiveJobs()) {
                wait(lock);
                setThreadAffinityById(state->id);
            }
        }
    } while (!exitRequested());
}

bool JobSystem::execute(JobSystem::ThreadState& state) noexcept {
    HEAVY_SYSTRACE_CALL();

    Job* job = pop(state.workQueue);
    if (UTILS_UNLIKELY(job == nullptr)) {
        // our queue is empty, try to steal a job
        job = steal(state);
    }

    if (job) {
        UTILS_UNUSED_IN_RELEASE
        uint32_t activeJobs = mActiveJobs.fetch_sub(1, std::memory_order_relaxed);
        assert(activeJobs); // whoops, we were already at 0
        HEAVY_SYSTRACE_VALUE32("JobSystem::activeJobs", activeJobs - 1);

        if (UTILS_LIKELY(job->function)) {
            HEAVY_SYSTRACE_NAME("job->function");
            job->function(job->storage, *this, job);
        }
        finish(job);
    }
    return job != nullptr;
}
execute实质上会获取一个state工作队列中的函数,或者steal一个state(有点类似TBB),当有工作的时候就执行,否则就wait。JobSystem可以类比OGRE2场景图更新时使用的多线程模式,只是泛化出来单独成为一个类型。
从上面给的CPU使用图可以看出,JobSystem在这个例子里面并没有太多事情可以做,最主要的是Engine::Loop,类似的也会调用一个execute函数:
FEngine* FEngine::create(...){
...
   // start the driver thread
        instance->mDriverThread = std::thread(&FEngine::loop, instance);

        // wait for the driver to be ready
        instance->mDriverBarrier.await();

        if (UTILS_UNLIKELY(!instance->mDriver)) {
            // something went horribly wrong during driver initialization
            instance->mDriverThread.join();
            return nullptr;
        }
...
}

int FEngine::loop() {
...
    while (true) {
        // looks like thread affinity needs to be reset regularly (on Android)
        JobSystem::setThreadAffinityById(id);
        if (!execute()) {
            break;
        }
    }
...
}

bool FEngine::execute() {
    // wait until we get command buffers to be executed (or thread exit requested)
    auto buffers = mCommandBufferQueue.waitForCommands();
    if (UTILS_UNLIKELY(buffers.empty())) {
        return false;
    }

    // execute all command buffers
    for (auto& item : buffers) {
        if (UTILS_LIKELY(item.begin)) {
            mCommandStream.execute(item.begin);
            mCommandBufferQueue.releaseBuffer(item);
        }
    }

    return true;
}
很明显可以看到FEngine::execute主要负责刷新命令队列,将命令push到GPU当中去。
总结
其实一圈整理下来能感受到Filament很多地方和OGRE还是非常类似的,只是因为Filament没有历史包袱,而OGRE则越来越臃肿。程序主体有三个部分:
- 首先用户SetUp场景
- 调用run进入事件循环,在事件循环中构造Frame Graph,最终execute执行资源配置。这个过程中JobSystem随时待命,辅助多线程update
- mCommandBufferQueue当中有命令后,Engine::Loop会启动,调用渲染命令开始绘制