这个系列文章会介绍一下如何基于 Open LDAP、React、MUI 组件库、Next.js 等技术实现一个 Google Material Design 风格的简单管理后台模板,本文首先介绍了用到的技术框架以及 Open LDAP 的安装、配置和部署,然后介绍了前后端代码实现和如何把项目免费部署到 Vercel 云。

图中红色部分属于应用状态,主要包括 LDAP 服务和数据库服务。可以看到数据库是虚线,因为这个项目仅仅是 Demo,暂时不涉及数据库操作。实际中,需要自己购买数据库服务或者自己搭建数据库服务器。LDAP 服务搭建在了我自己的服务器上,代码免费跑在 Vercel 云上,是无状态的。
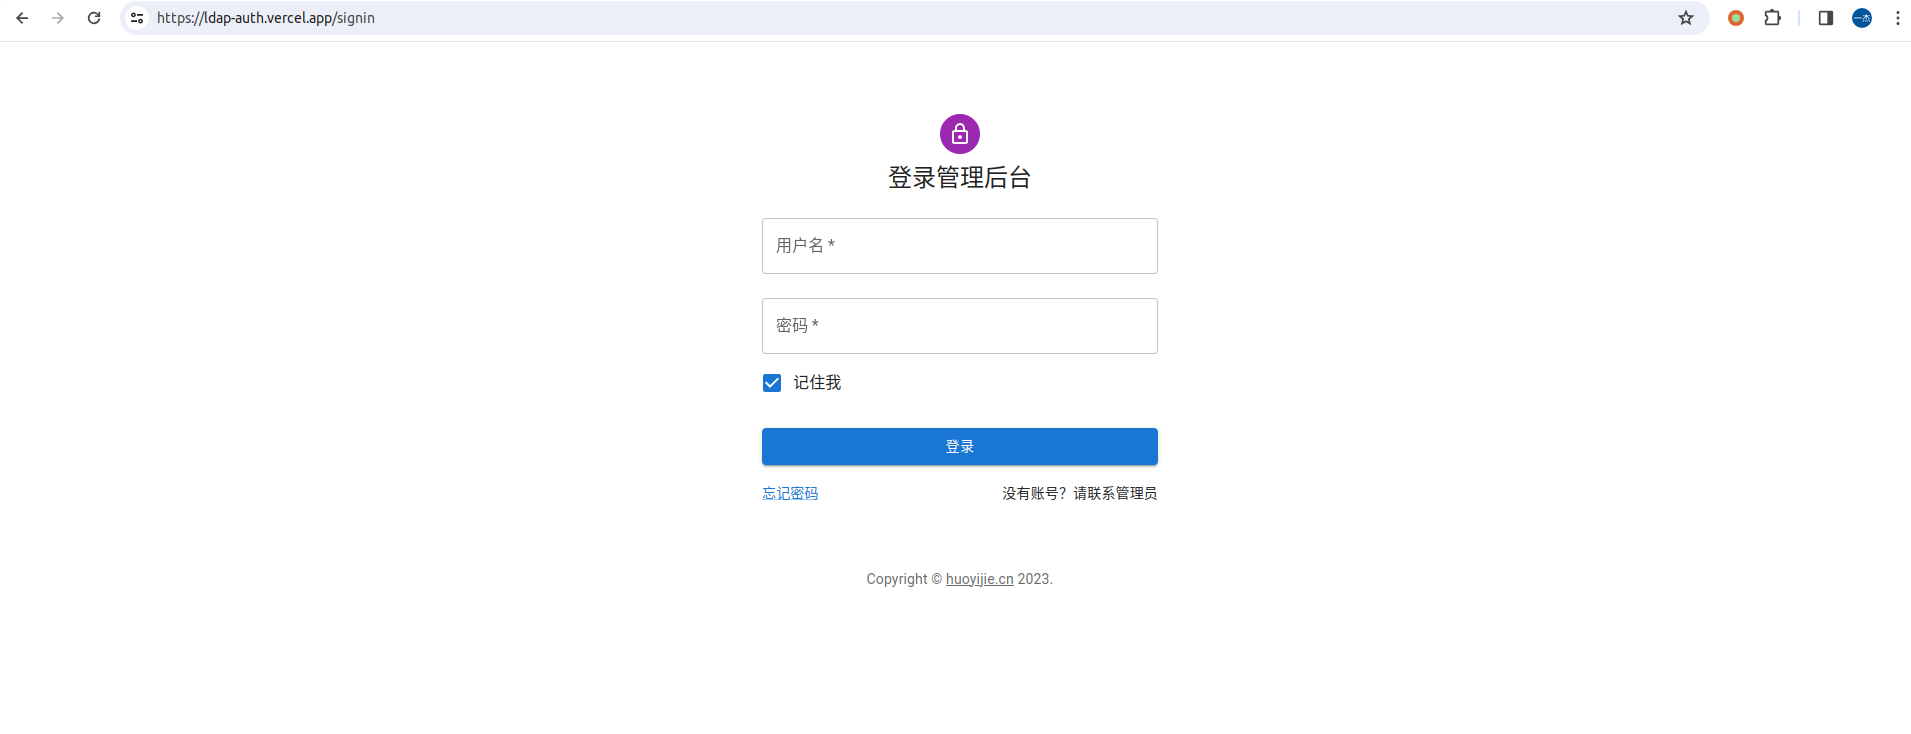
- 用户名: huoyijie
- 密码:123456
Next.js 是一个用于构建现代 React 应用程序的流行开源框架。它提供了一组强大的工具和约定,使得 React 应用的开发变得更加简单和高效。
Material-UI 是一个基于 React 的流行开源组件库,用于构建符合 Google Material Design 规范的用户界面。MUI 提供了一套丰富而灵活的 React 组件,使开发人员能够轻松创建具有现代外观和交互的 Web 应用程序。这个库提供了各种组件,包括按钮、表单、导航、对话框等,这些组件遵循 Material Design 的设计原则。
LDAP(轻量目录访问协议,Lightweight Directory Access Protocol)是一种用于访问和维护分布式目录信息服务的协议。LDAP 最初设计用于提供一种轻量级的、低开销的访问目录信息的方法。目录服务是一种特殊的数据库,用于存储和检索组织中的信息,例如用户、计算机、组织单元等。LDAP 在企业网络中广泛应用,可用来实现统一身份认证,让用户在多个服务中使用相同的身份和密码,也常常配合企业内部实现单点登录(SSO)。
OpenLDAP 是一个开源的 LDAP 实现,而 Microsoft Active Directory(AD)是一个广泛使用的 LDAP 目录服务的实例,用于 Windows 环境中的身份认证和目录服务。
录入用户信息时,还是会写入数据库中,同时导出一份数据写入 openLDAP 中,并保持数据随时同步。后面系统进行用户认证时,直接与 openLDAP 交互即可。
# Ubuntu 22.04
$ sudo apt install slapd
$ sudp apt install ldap-utils
进行初始设置,注意会提示设置管理员密码,后面管理和程序连接时会用到。
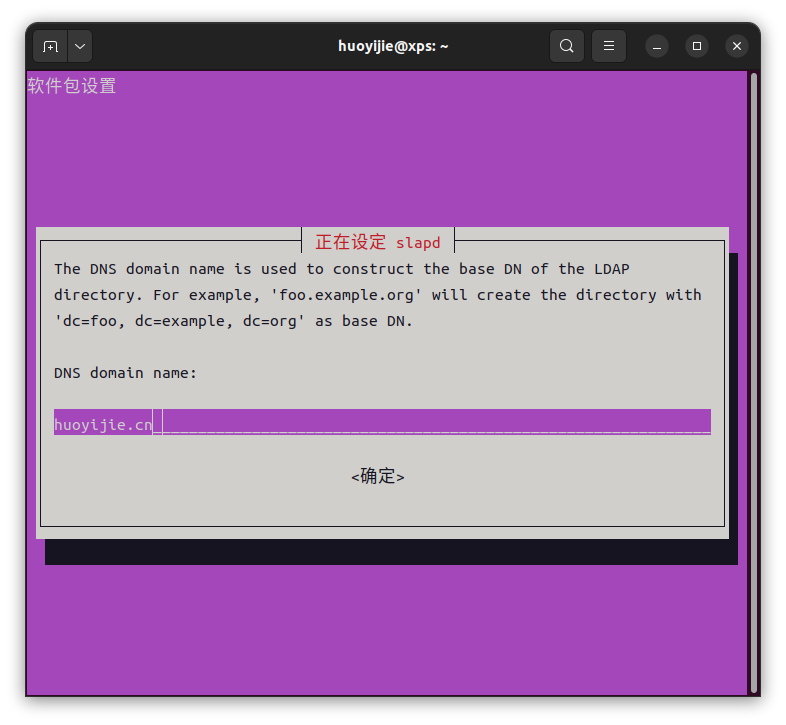
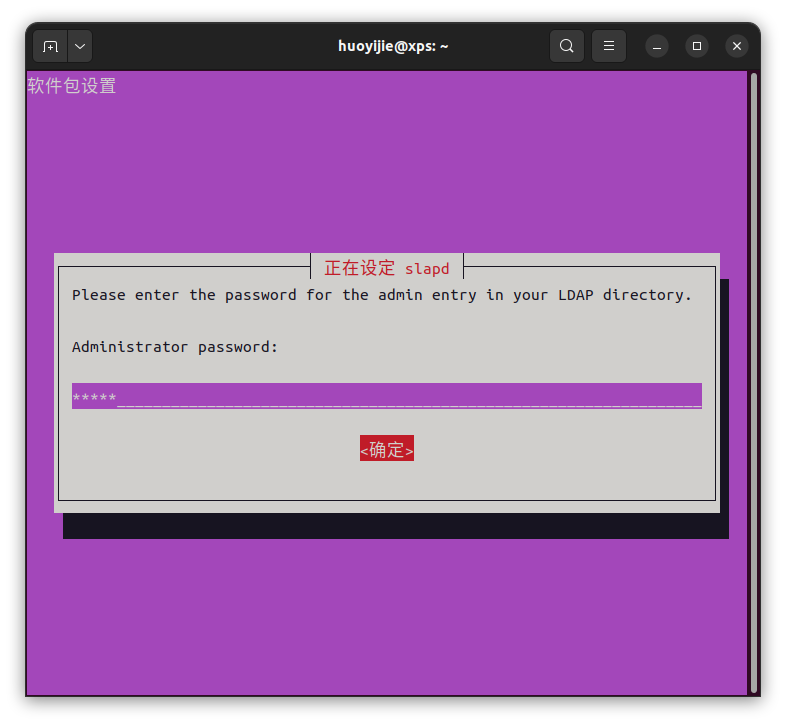
$ sudo dpkg-reconfigure slapd设定域
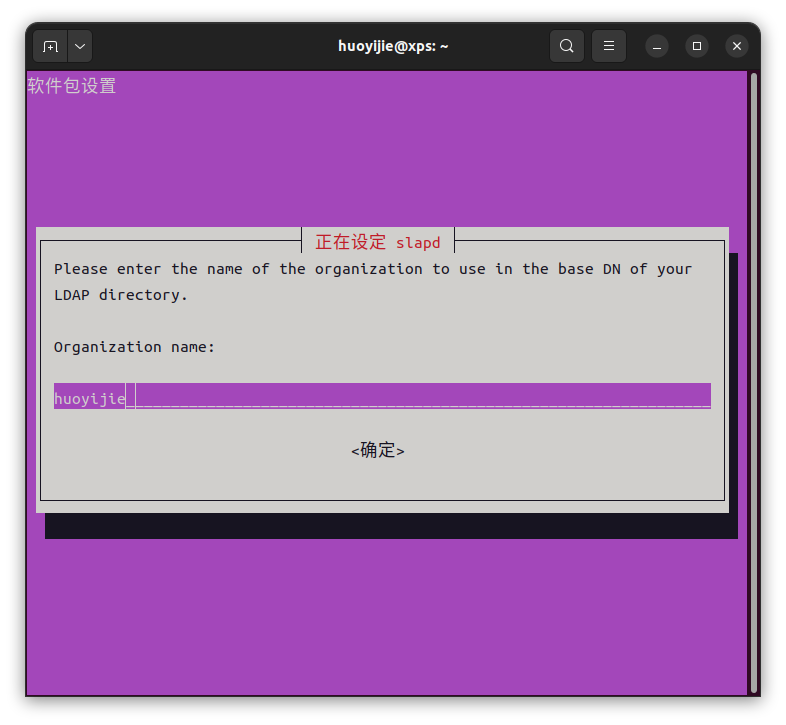
设定组织名称
设定管理员密码
检查 openldap 已正常运行
$ ldapsearch -x -LLL -D cn=admin,dc=huoyijie,dc=cn -W -b dc=huoyijie,dc=cn
Enter LDAP Password: ******
dn: dc=huoyijie,dc=cn
objectClass: top
objectClass: dcObject
objectClass: organization
o: huoyijie
dc: huoyijie
添加测试用户,创建一个 user.ldif 文件,编辑内容:
# 添加 users 组
dn: ou=users,dc=huoyijie,dc=cn
objectClass: organizationalUnit
objectClass: top
ou: users

# 添加用户 huoyijie
dn: uid=huoyijie,ou=users,dc=huoyijie,dc=cn
objectClass: top
objectClass: person
objectClass: organizationalPerson
objectClass: inetOrgPerson
uid: huoyijie
cn: Yijie Huo
sn: Huo
userPassword: 123456
mail: huoyijie@huoyijie.cn
运行 ldapadd 命令
$ ldapadd -x -D "cn=admin,dc=huoyijie,dc=cn" -W -f user.ldif
Enter LDAP Password:
adding new entry "ou=users,dc=huoyijie,dc=cn"

adding new entry "uid=huoyijie,ou=users,dc=huoyijie,dc=cn"- -x: 使用简单身份验证。
- -D: 指定用于绑定到 LDAP 服务器的管理员 DN。
- -W: 提示输入管理员密码
- -f: 指定包含 LDIF 数据的文件
在执行该命令后,系统将提示输入管理员密码,然后将 LDIF 文件中的用户数据添加到 LDAP 中。
查询验证新用户
$ ldapsearch -x -D "cn=admin,dc=huoyijie,dc=cn" -W -b "ou=users,dc=huoyijie,dc=cn" "(uid=huoyijie)"
Enter LDAP Password:
# extended LDIF
#
# LDAPv3
# base <ou=users,dc=huoyijie,dc=cn> with scope subtree
# filter: (uid=huoyijie)
# requesting: ALL
#

# huoyijie, users, huoyijie.cn
dn: uid=huoyijie,ou=users,dc=huoyijie,dc=cn
objectClass: top
objectClass: person
objectClass: organizationalPerson
objectClass: inetOrgPerson
uid: huoyijie
cn: Yijie Huo
sn: Huo
userPassword:: MTIzNDU2
mail: huoyijie@huoyijie.cn

# search result
search: 2
result: 0 Success

# numResponses: 2
# numEntries: 1- -x: 使用简单身份验证。
- -D: 指定用于绑定到 LDAP 服务器的管理员 DN。
- -W: 提示输入管理员密码。
- -b: 指定搜索的起始点(Base DN)
- "(uid=huoyijie)": 指定 LDAP 搜索过滤器,这里是根据 uid 进行搜索
开启 LDAPS 加密
$ sudo apt install gnutls-bin ssl-cert
# 生成 CA key
$ sudo certtool --generate-privkey --bits 4096 --outfile /etc/ssl/private/mycakey.pem
编辑 /etc/ssl/ca.info 文件
cn = huoyijie.cn
ca
cert_signing_key
expiration_days = 3650
创建 CA 证书
# 创建自签名 CA 证书
$ sudo certtool --generate-self-signed \
--load-privkey /etc/ssl/private/mycakey.pem \
--template /etc/ssl/ca.info \
--outfile /usr/local/share/ca-certificates/mycacert.crt
# 更新受信任 CA 证书列表,增加刚刚创建的 mycacert.crt
$ sudo update-ca-certificates
Updating certificates in /etc/ssl/certs...
rehash: warning: skipping ca-certificates.crt,it does not contain exactly one certificate or CRL
1 added, 0 removed; done.
Running hooks in /etc/ca-certificates/update.d...
done.
为 LDAP server 生成 key 文件
$ sudo certtool --generate-privkey \
--bits 2048 \
--outfile /etc/ldap/ldap01_slapd_key.pem
编辑 /etc/ssl/ldap01.info 文件
organization = huoyijie
cn = LDAP01
ip_address = $LDAP_SERVER_IP
tls_www_server
encryption_key
signing_key
expiration_days = 3650
PS: 服务器没有域名,所以生成证书时,需配置 Subject Alt Name=IP地址,把 $LDAP_SERVER_IP 替换为服务器实际 ip 地址。如果有域名,只配置 cn = dnsname,不需要配置 ip_address = $LDAP_SERVER_IP
创建 LDAP server 证书
$ sudo certtool --generate-certificate \
--load-privkey /etc/ldap/ldap01_slapd_key.pem \
--load-ca-certificate /etc/ssl/certs/mycacert.pem \
--load-ca-privkey /etc/ssl/private/mycakey.pem \
--template /etc/ssl/ldap01.info \
--outfile /etc/ldap/ldap01_slapd_cert.pem
# 改变文件所属
sudo chown openldap:openldap /etc/ldap/ldap01_slapd_cert.pem
sudo chown openldap:openldap /etc/ldap/ldap01_slapd_key.pem
编辑文件 certinfo.ldif
dn: cn=config
add: olcTLSCACertificateFile
olcTLSCACertificateFile: /etc/ssl/certs/mycacert.pem
-
add: olcTLSCertificateFile
olcTLSCertificateFile: /etc/ldap/ldap01_slapd_cert.pem
-
add: olcTLSCertificateKeyFile
olcTLSCertificateKeyFile: /etc/ldap/ldap01_slapd_key.pem
启用 LDAP TLS 配置
sudo ldapmodify -Y EXTERNAL -H ldapi:/// -f certinfo.ldif编辑文件 /etc/default/slapd
SLAPD_SERVICES="ldap://127.0.0.1:389/ ldaps:/// ldapi:///"
测试 LDAPS:
# 重启 slapd
$ sudo systemctl restart slapd
$ ldapwhoami -x -H ldaps://{LDAP_SERVER_IP}
anonymous
PS: LDAP_SERVER_IP 替换为 LDAP 实际地址
$ npx create-next-app user-auth-with-openldap
Need to install the following packages:
create-next-app@14.0.4
Ok to proceed? (y) y
✔ Would you like to use TypeScript? … No / Yes
✔ Would you like to use ESLint? … No / Yes
✔ Would you like to use Tailwind CSS? … No / Yes
✔ Would you like to use `src/` directory? … No / Yes
✔ Would you like to use App Router? (recommended) … No / Yes
✔ Would you like to customize the default import alias (@/*)? … No / Yes
启动应用
$ npm run dev
> user-auth-with-openldap@0.1.0 dev
> next dev
▲ Next.js 14.0.4
- Local: http://localhost:3000
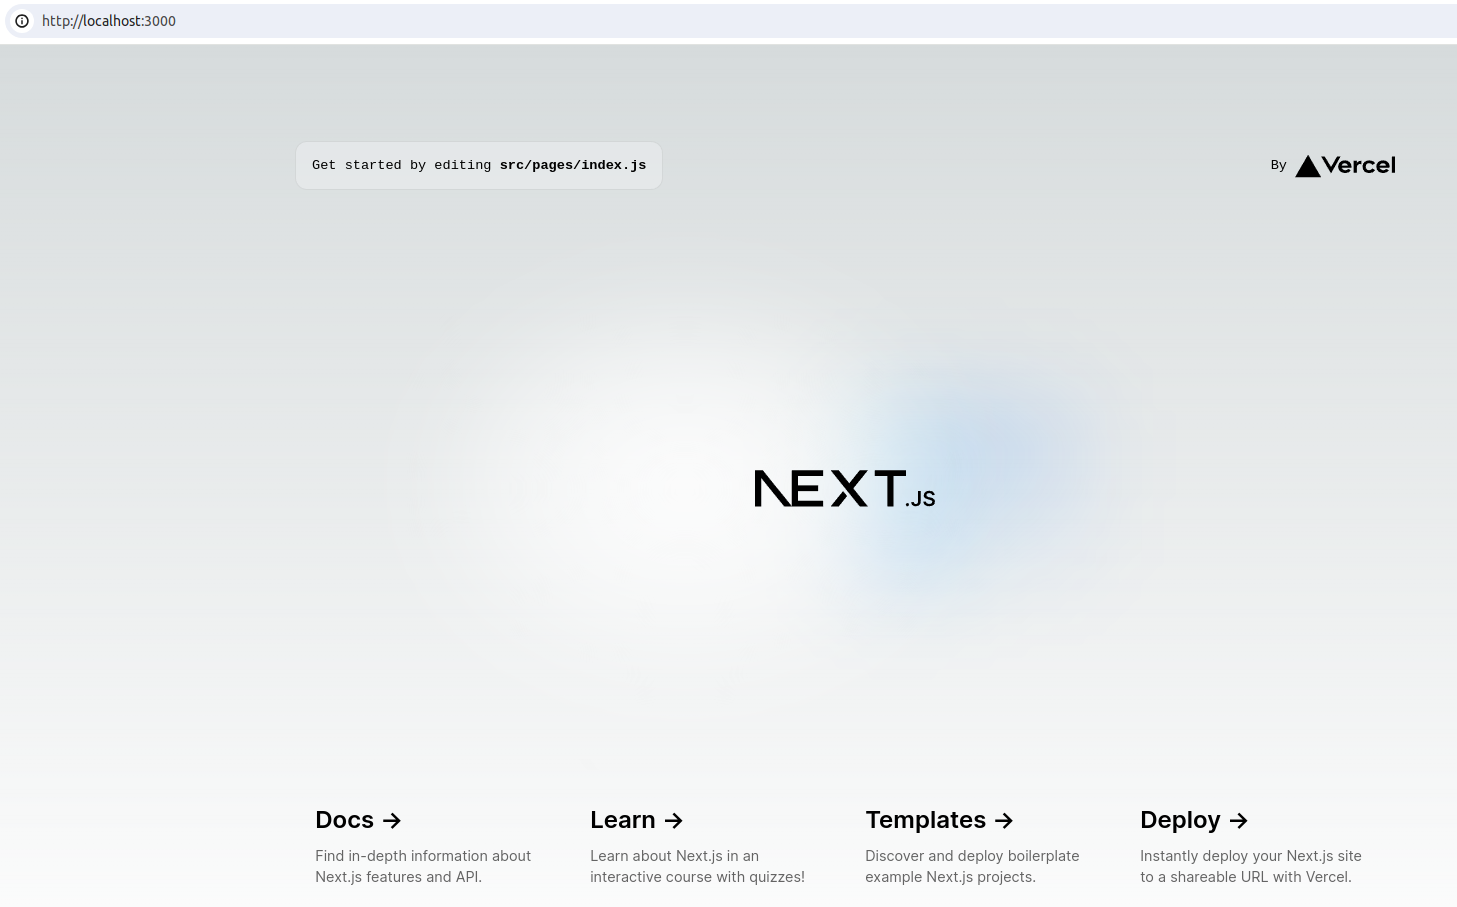
✓ Ready in 766ms点击 http://localhost:3000/ 打开浏览器
$ npm install @mui/material @emotion/react @emotion/styled
# font
$ npm install @fontsource/roboto
# icons
$ npm install @mui/icons-material
编辑 src/pages/_app.js 文件
// 全局配置,引入字体
import "@fontsource/roboto/300.css";
import "@fontsource/roboto/400.css";
import "@fontsource/roboto/500.css";
import "@fontsource/roboto/700.css";
export default function App({ Component, pageProps }) {
return (
<>
<Head>
{/* Responsive meta tag */}
<meta name="viewport" content="initial-scale=1, width=device-width" />
</Head>
{/* 可选,修复一些跨浏览器和设备的不一致性 */}
<CssBaseline />
<Component {...pageProps} />
</>
);
}一个流行的 react 表单库,帮助快速构建各种复杂的表单。
$ npm install react-hook-form登录页面用到了表单:
import Avatar from '@mui/material/Avatar'
import Button from '@mui/material/Button'
import TextField from '@mui/material/TextField'
import FormControlLabel from '@mui/material/FormControlLabel'
import Checkbox from '@mui/material/Checkbox'
import Link from '@mui/material/Link'
import Grid from '@mui/material/Grid'
import Box from '@mui/material/Box'
import CircularProgress from '@mui/material/CircularProgress'
import Typography from '@mui/material/Typography'
import LockOutlinedIcon from '@mui/icons-material/LockOutlined'

import { useState } from 'react'
import { useRouter } from 'next/router'

// 这里引入表单 hook
import { useForm, Controller } from 'react-hook-form'

import useMutation from './hooks/useMutation'
import useToken from './hooks/useToken'
import LayoutUnlogin from './LayoutUnlogin'
import FeedbackSnackbar from './FeedbackSnackbar'
import util from '@/lib/util'

export default function SignIn() {
  const router = useRouter()
  const [showFeedback, setShowFeedback] = useState(false)
  const token = useToken()

  const { trigger: grantToken, isMutating, error } = useMutation({ url: '/api/token/grant' })
  const [submitting, setSubmitting] = useState(false)
  const disabled = isMutating || submitting

  // 表单
  const { handleSubmit, control, formState: { errors } } = useForm()

  const onSubmit = async ({ username, password }) => {
    setSubmitting(true)

    try {
      const data = await grantToken({
        username,
        password,
      })
      token.set(data)
      setShowFeedback(true)
      await util.wait(1000)
      router.push('/')
    } catch (error) {
      setShowFeedback(true)
      setSubmitting(false)
    }
  }

  return (
    <LayoutUnlogin>
      <FeedbackSnackbar open={showFeedback} isError={!!error} message={!!error ? (error.message || '登录失败') : '登录成功'} onClose={() => setShowFeedback(false)} />

      <Avatar sx={{ m: 1, bgcolor: 'secondary.main' }}>
        <LockOutlinedIcon />
      </Avatar>
      <Typography component="h1" variant="h5">
        登录管理后台
      </Typography>

      <Box component="form" onSubmit={handleSubmit(onSubmit)} noValidate sx={{ mt: 1 }}>
        {/* 注意 Controller */}
        <Controller
          name="username"
          control={control}
          rules={{
            required: '请输入用户名',
            minLength: {
              value: 6,
              message: '用户名长度不能小于6'
            },
            maxLength: {
              value: 32,
              message: '用户名长度不能大于32'
            },
          }}
          defaultValue=""
          render={({ field }) => (
            <TextField
              id="username"
              label="用户名"
              error={!!errors.username}
              helperText={errors.username?.message}
              {...field}
              margin="normal"
              required
              fullWidth
              autoComplete="username"
              autoFocus
              disabled={disabled}
            />
          )}
        />
        <Controller
          name="password"
          control={control}
          rules={{
            required: '请输入密码',
            minLength: {
              value: 6,
              message: '密码长度不能小于6',
            },
            maxLength: {
              value: 32,
              message: '密码长度不能大于32'
            },
          }}
          defaultValue=""
          render={({ field }) => (
            <TextField
              id="password"
              type="password"
              label="密码"
              error={!!errors.password}
              helperText={errors.password?.message}
              {...field}
              margin="normal"
              required
              fullWidth
              autoComplete="current-password"
              disabled={disabled}
            />
          )}
        />
        <Controller
          name="rememberMe"
          control={control}
          rules={{
            onChange: (e) => token.setRememberMe(e.target.value),
          }}
          render={({ field }) => (
            <FormControlLabel
              control={
                <Checkbox
                  id="rememberMe"
                  {...field}
                  checked={token.rememberMe}
                  disabled={disabled}
                />
              }
              label="记住我"
            />
          )}
        />
        <Button
          type="submit"
          fullWidth
          variant="contained"
          disabled={disabled}
          sx={{ mt: 3, mb: 2 }}
        >
          {isMutating ? (
            <CircularProgress size={24} />
          ) : (
            '登录'
          )}
        </Button>
        <Grid container>
          <Grid item xs>
            <Link href="#" variant="body2">
              忘记密码
            </Link>
          </Grid>
          <Grid item>
            <Typography component="span" variant="body2">
              没有账号?请联系管理员
            </Typography>
          </Grid>
        </Grid>
      </Box>
    </LayoutUnlogin>
  )
}用户在登录成功后会把 token 写入存储,勾选"记住我",写入 localStorage,未勾选写入 sessionStorage。sessionStorage 中的内容在会话结束后会自动清理掉(如关闭网页或退出浏览器)。
刚开始尝试使用 react-use(39k stars),但遇到了一个问题不能很好的实现。在查看 issues 时,看到有开发者提到 @react-hookz/web 这个库提供了参数可以解决这个问题,而我只需要用到存储 hook,所以就用了这个库。
$ npm i @react-hookz/web我封装了 src/components/hooks/useToken 这个 hook 函数专门用来读写 token。
import { useLocalStorageValue, useSessionStorageValue } from '@react-hookz/web'

export default function useToken() {
  const rememberMe = useLocalStorageValue('remember_me', {
    defaultValue: false,
    initializeWithValue: false,
  })
  const localToken = useLocalStorageValue('token', {
    initializeWithValue: false,
  })
  const sessionToken = useSessionStorageValue('token', {
    initializeWithValue: false,
  })

  const token = rememberMe.value ? localToken : sessionToken

  return {
    // not undefined, but 'undefined'
    ready: (typeof token.value != 'undefined'),
    rememberMe: rememberMe.value || false,
    setRememberMe(value) {
      rememberMe.set(value)
    },
    value: token.value,
    set(data) {
      this.remove()
      token.set(data)
    },
    remove() {
      localToken.remove()
      sessionToken.remove()
    },
  }
}/api/token/grant 接口在处理用户登录时,会连接 LDAP 服务器,对用户进行认证,如果成功就会返回 jwt token,包含一个短期有效 access_token 和一个长期有效的 refresh_token,当 access_token 失效后可以通过后者获取新的 token(刷新 token 的逻辑本次暂未实现)。
我把 token 相关操作封装在了 src/lib/api/util.js 文件中:
import crypto from 'crypto'
import jwt from 'jsonwebtoken'

const { SECRET_KEY, ACCESS_TOKEN_EXPIRES } = process.env

export default {
  newToken(username) {
    const accessToken = jwt.sign(
      { username },
      SECRET_KEY,
      { expiresIn: ACCESS_TOKEN_EXPIRES })

    const refreshToken = crypto.randomBytes(32).toString('base64url')

    return {
      access_token: accessToken, token_type: 'Bearer',
      expires_in: ACCESS_TOKEN_EXPIRES,
      refresh_token: refreshToken
    }
  },

  getToken(req) {
    const { authorization } = req.headers
    if (authorization) {
      return authorization.replace('Bearer ', '')
    }
  },

  verifyToken(accessToken) {
    return jwt.verify(accessToken, SECRET_KEY)
  },

  verifyMethod(req, method) {
    return req.method.toUpperCase() === method.toUpperCase()
  },

  wrapper(handler, method) {
    return async (req, res) => {
      const data = this.verifyMethod(req, method) ? await handler(req, res) : {
        statusCode: 405,
        code: 'MethodNotAllowed',
        message: '请求方法找不到',
      }

      res.status(data.statusCode || 200).json(data)
    }
  },
}$ npm i ldapjs/api/token/grant 接口收到登录请求后会通过这个库连接 LDAP 服务器,可以看看 src/pages/api/token/grant.js 文件
import ldap from 'ldapjs'
import util from '@/lib/api/util'
import handleUncaughtError from '@/lib/api/middleware/handleUncaughtError'
import post from '@/lib/api/middleware/post'

function bindAsync(client, userDN, password) {
  return new Promise((resolve, reject) => {
    client.bind(userDN, password, (err) => {
      if (err) {
        reject(err)
      } else {
        resolve()
      }
    })
  })
}

function unbindAsync(client) {
  return new Promise((resolve, reject) => {
    client.unbind((err) => {
      if (err) {
        reject(err)
      } else {
        resolve()
      }
    })
  })
}

async function ldapAuthenticate(username, password) {
  const ldapOptions = {
    // 通过环境变量配置 LDAP 服务器 URL
    url: process.env.LDAP_SERVER,
    tlsOptions: {
      rejectUnauthorized: false, // 禁用证书验证
    },
  }

  const userDN = `uid=${username},ou=users,dc=huoyijie,dc=cn`

  const client = ldap.createClient(ldapOptions)

  try {
    await bindAsync(client, userDN, password)
    // Perform other LDAP operations if needed...
    await unbindAsync(client)
    return true
  } catch (err) {
    return false
  }
}

async function grant(req) {
  const { username, password } = req.body

  if (await ldapAuthenticate(username, password)) {
    return util.newToken(username)
  } else {
    return { statusCode: 400, code: 'BadRequest', message: '用户名或密码不正确' }
  }
}

export default handleUncaughtError(post(grant))$ npm i swr我自己认为通过 swr 实现 Data Fetching 是这个项目中非常值得一看的点。摆脱了以往在页面生命周期函数或者 useEffect 中执行 Data Fetching,提出了声明式、响应式的数据获取方法,非常直观清晰。
请看下面这段示例代码,Profile 组件先是声明请求 /api/user 接口,如果正在加载数据显示 loading...,如果遇到错误显示错误,如果数据获取成功则显示名字。
我们知道请求 api 接口是不可能立刻返回的,要等到服务器接收到请求并返回响应,但是下面这段代码是很神奇的,会不断根据数据获取的最新状态实时刷新页面。
import useSWR from 'swr'

function Profile() {
  const { data, error, isLoading } = useSWR('/api/user')

  if (isLoading) return <div>loading...</div>
  if (error) return <div>failed to load</div>
  return <div>hello {data.name}!</div>
}
对比一下传统可能的写法:
function Profile() {
  const [isLoading, setLoading] = useState()
  const [error, setError] = useState()
  const [data, setData] = useState()

  const getProfile = async () => {
    setLoading(true)
    try {
      const res = await fetch('/api/user')
      if (!res.ok) {
        setError('response was not ok')
      } else {
        setData(res.json())
      }
    } catch (e) {
      setError(e)
    } finally {
      setLoading(false)
    }
  }

  useEffect(() => {
    getProfile()
  }, [])

  if (error) return <div>failed to load</div>
  if (isLoading) return <div>loading...</div>
  return <div>hello {data.name}!</div>
}
除了上面提到的这点,swr 还实现了很多有价值的特性,值得我们学习一下。
和 swr 相关的文件主要是:
src/lib/fetcher.jssrc/components/hooks/useQuerysrc/components/hooks/useMutationsrc/components/AppSWRConfig
其中 AppSWRConfig 中配置了全局的 fetcher 函数和 Data Fetching 错误处理函数。
一个基于 React 的 Charts 图表库。
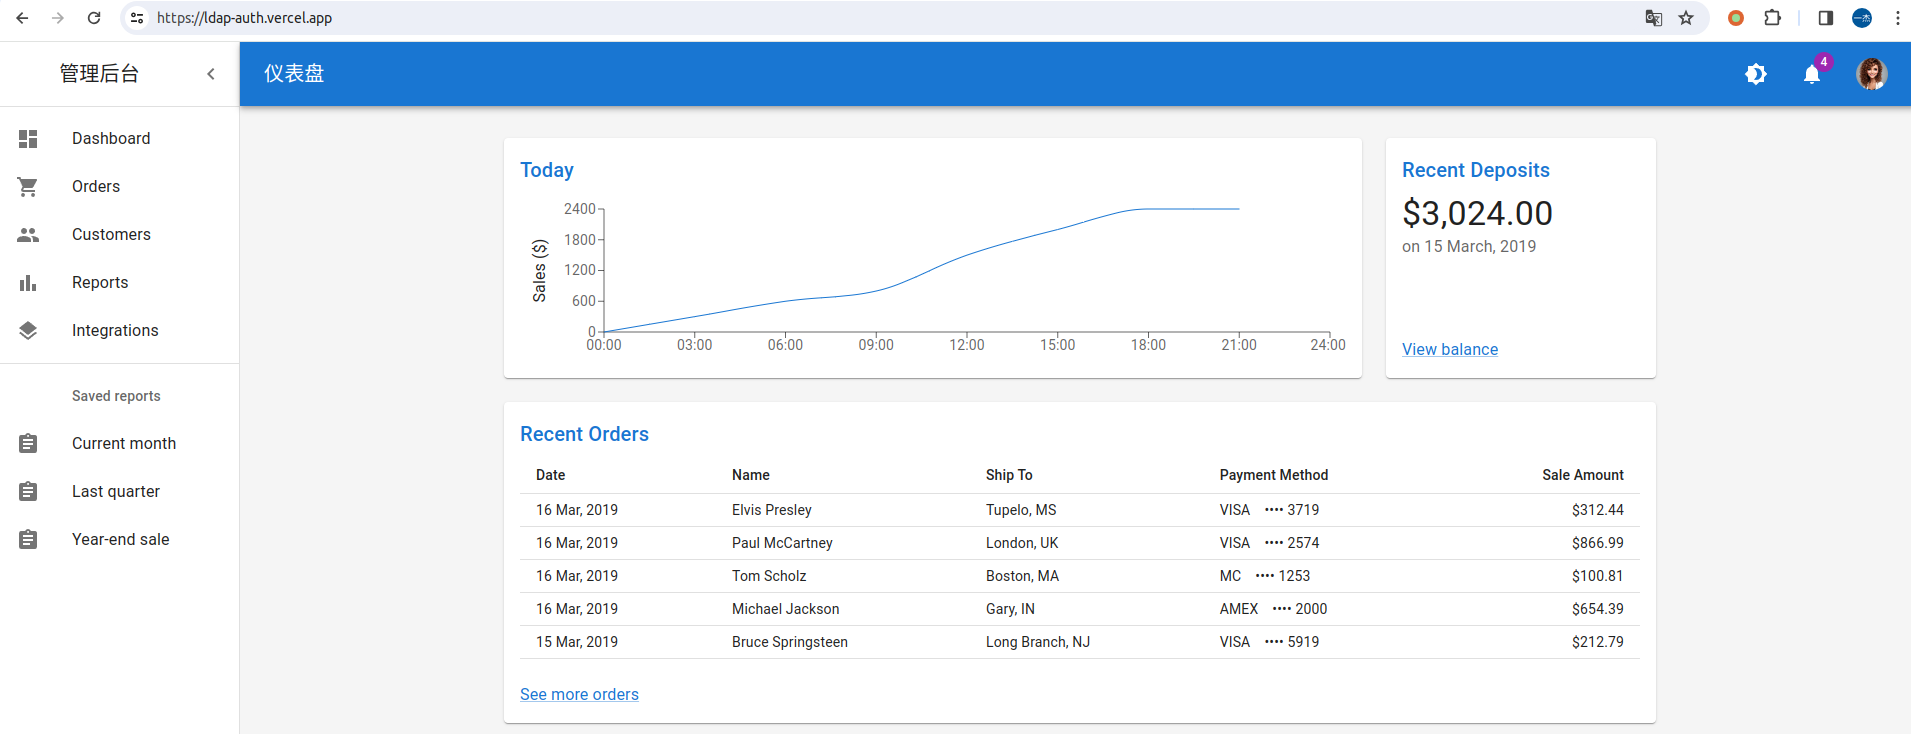
$ npm i rechartsDashboard 上显示的图表就是用这个库生成的。
前端如 Layout、LayoutUnlogin、AppBar、Drawer 等等组件,后端如 src/lib/api/middleware 下面的扩展中间件函数,实现了 token 校验和全局错误捕获处理等。
打开 vercel.com 网站,注册会员(可通过 github 第三方登录),登录后要注意要选择 Hobby 免费计划。
# 全局安装 vercel cli
$ npm install -g vercel

# 会自动打开浏览器,授权终端登录 vercel 账号
$ vercel login
进入到项目根目录
# build
$ vercel build
# 部署到云
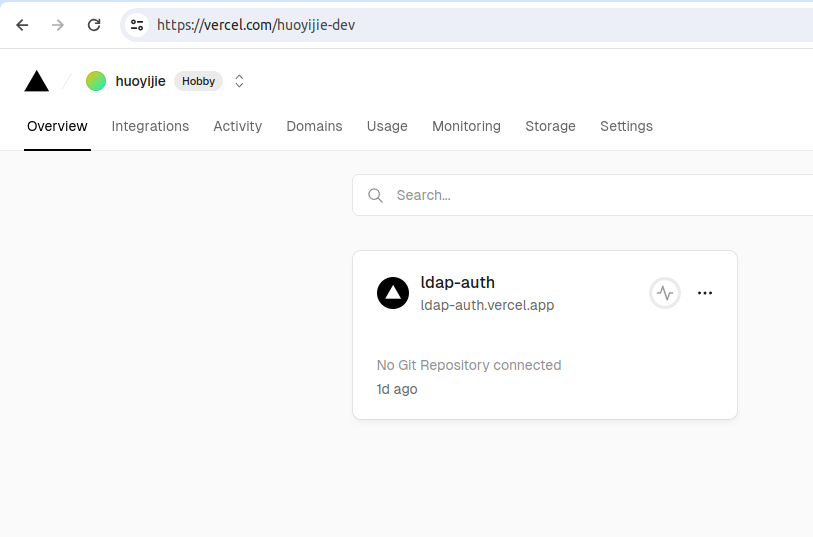
$ vercel --prebuilt等待一会儿,控制台会提示部署成功,此时打开 vercel.com 网站,就可以看到刚刚的部署了。
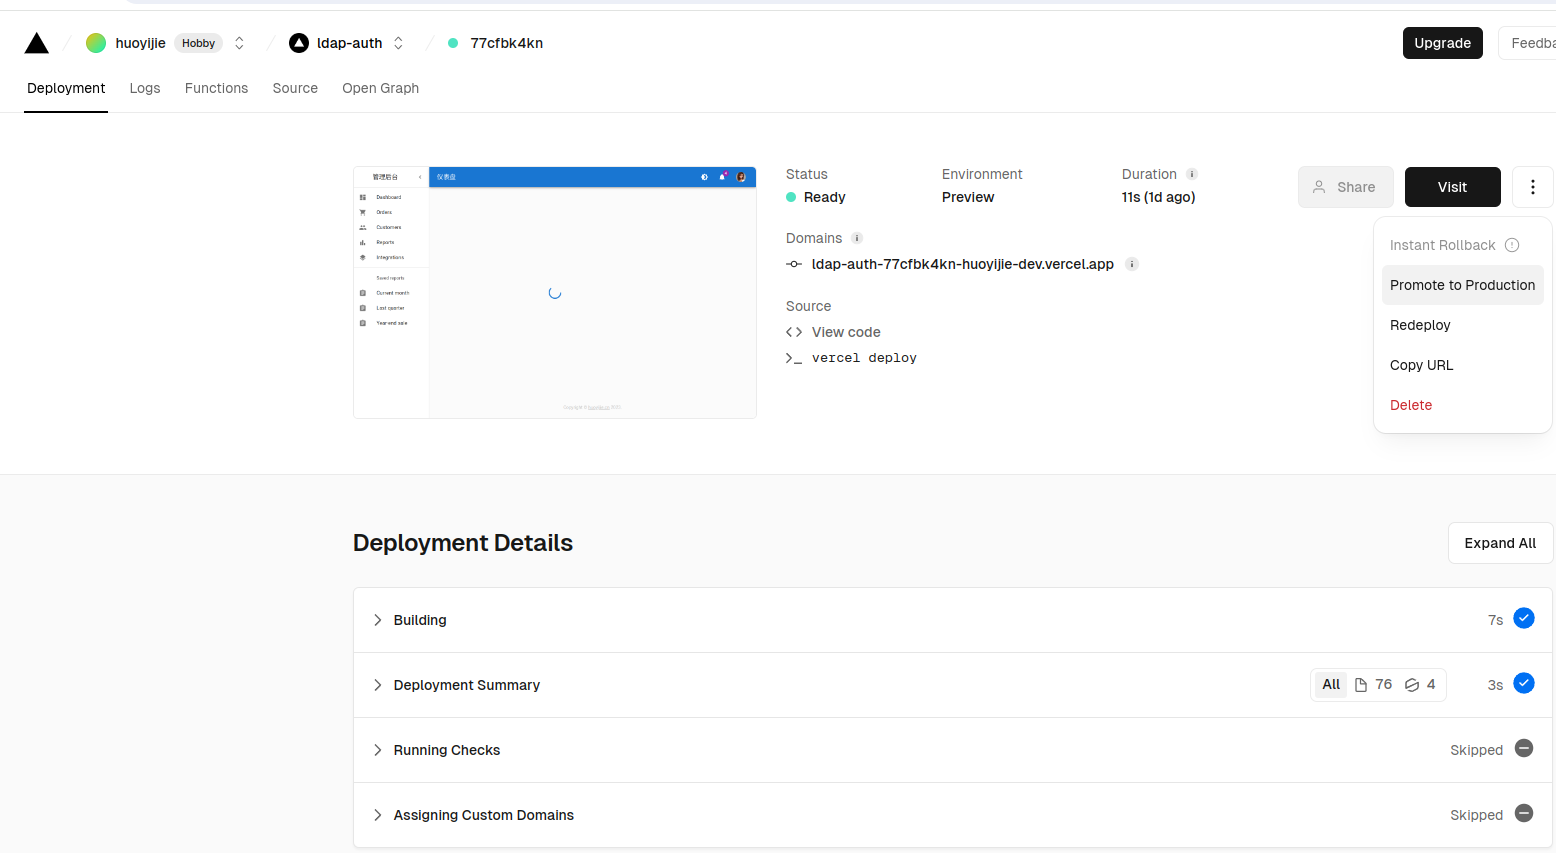
可以看到 Environment 是 Preview,此时仅限开发人员可以打开,可以测试一下看看功能是否正常。点击 Visit 按钮右边下拉菜单,点击 Promote to Production 可以发布到生产正式环境。
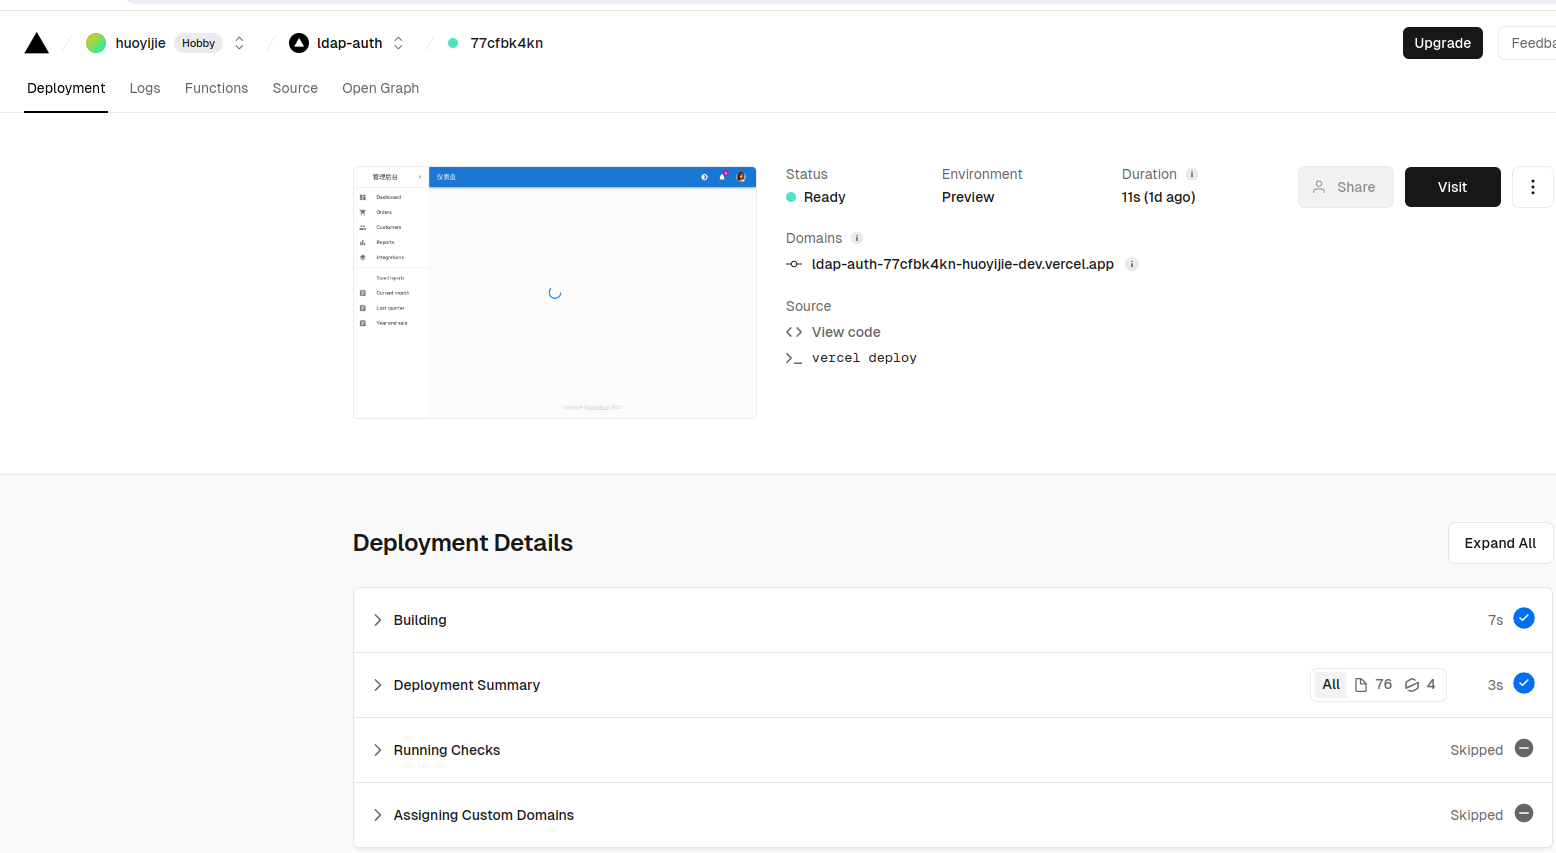
此时打开 https://ldap-auth.vercel.app/ 可以访问网站了。
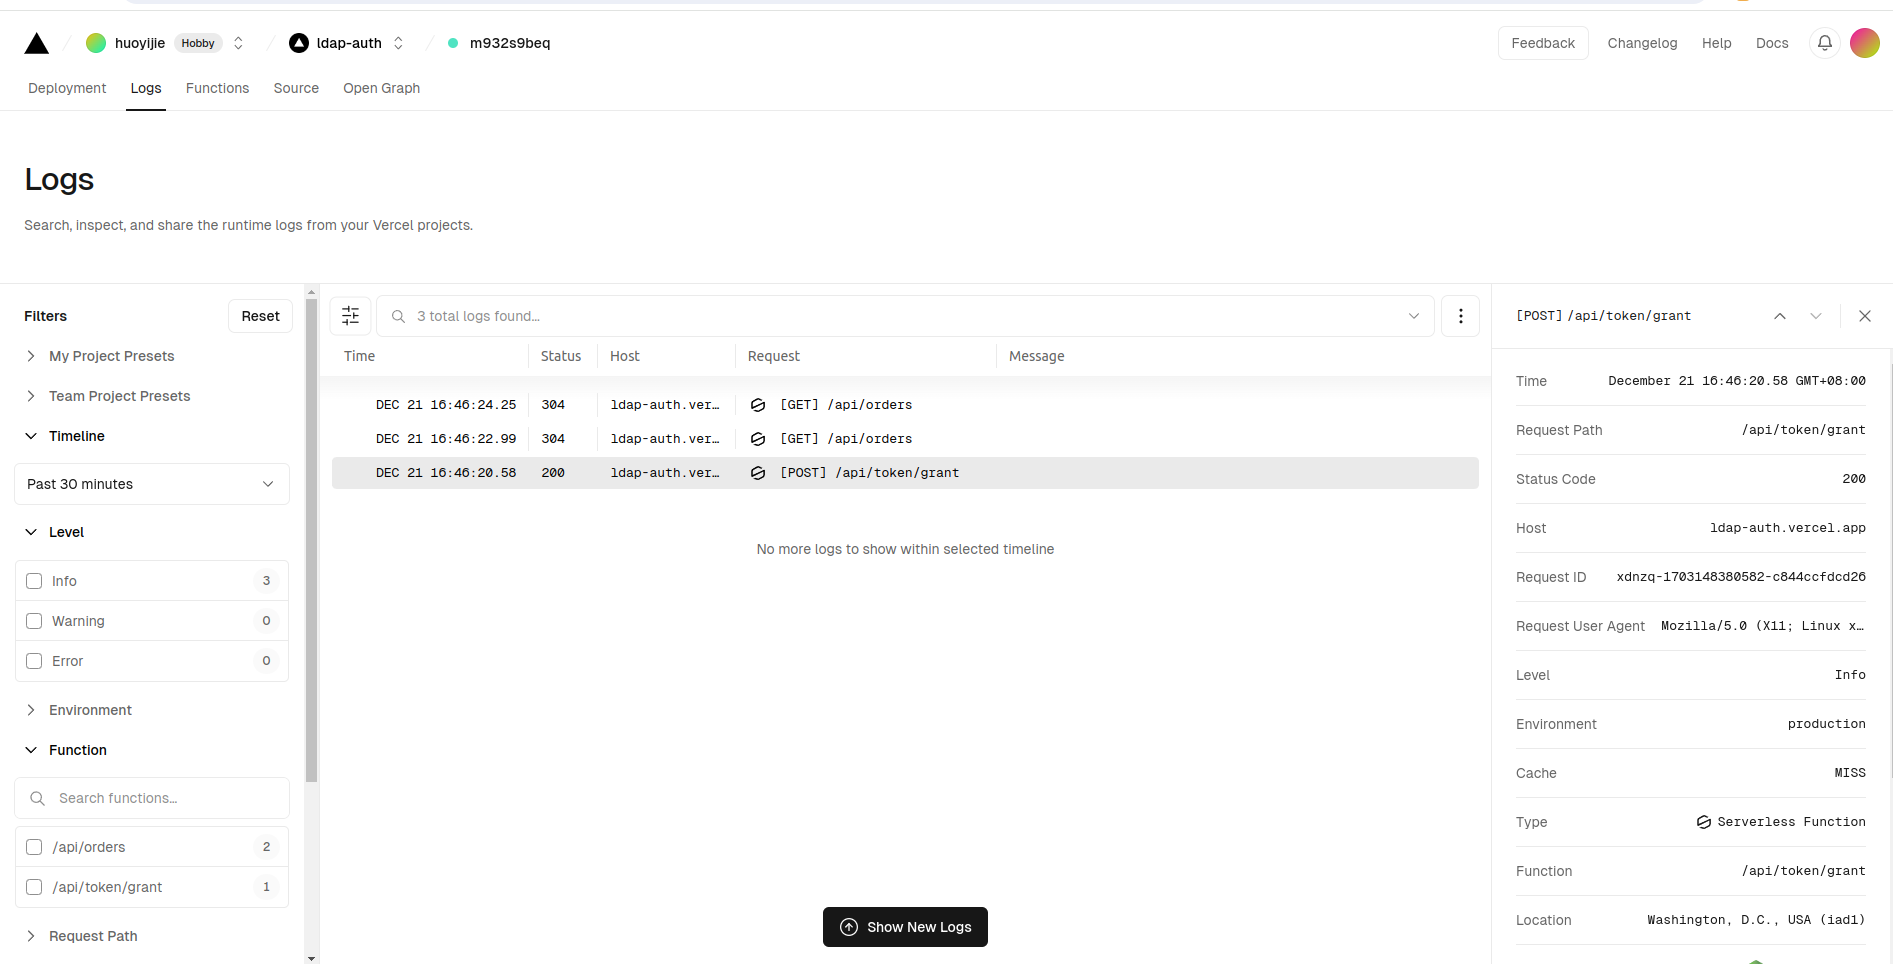
如上图,可以在网站控制台上查询 API 访问日志,会显示 http 状态码,如果有异常错误,右边也会显示具体错误信息。
本文主要从代码实现角度粗略分享了一些主要内容,看完后建议可以打开项目代码浏览一遍,也可以尝试在本地运行一下,不过要在电脑上安装配置 OpenLDAP。
运行项目需要配置几个环境变量,在项目根目录建立 .env 或 .env.development 文件,并编辑内容如下:
# 本地安装 openLDAP 可以不用开启 TLS
LDAP_SERVER=ldap://127.0.0.1
# 如果要尝试开启 TLS,使用下面的配置
# LDAP_SERVER=ldaps://127.0.0.1

# 随机生成的 uuid,作为生成 JWT Token 的密钥
SECRET_KEY=fe8c1d970acd410c89f0d0148d3ebd0b

# access token 过期时间,单位毫秒
ACCESS_TOKEN_EXPIRES=3600000
可以看到通过 Next.js 实现一个全栈项目(API 轻量无状态),最后部署到 Vercel 云,整个过程还是比较容易的,效果也很 Nice。当然一个应用不可能完全没有状态,此时可以配合自己搭建数据库服务器来存储应用状态,这时会出现 Vercel 云跨互联网访问其他数据库服务器的情况,记得一定要开启 TLS。