一行代码画一个表格,UIView分类,可以很简单的画excel表格
#####1、效果: 很多app用到了这种html元素效果,写了个demo 效果如下:

#####2、使用方法:
只需要一行代码 ,可以自定义文字颜色、背景颜色、合并单元格、点击事件等操作
/**
     * 创建一个表格
     * line:列数
     * columns:行数
     * data:数据
     */
    [v1 wzb_drawListWithRect:v1.bounds line:4 columns:3 datas:@[@"", @"语文", @"数学", @"英语", @"王晓明", @"100.5", @"128", @"95", @"李小华", @"100.5", @"128", @"95", @"张爱奇", @"100.5", @"128", @"95"]];
/**
 * 创建一个表格
 * line:列数
 * columns:行数
 * data:数据
 */
- (void)wzb_drawListWithRect:(CGRect)rect line:(NSInteger)line columns:(NSInteger)columns datas:(NSArray *)datas;

/**
 * 创建一个表格
 * line:列数
 * columns:行数
 * data:数据
 * lineInfo:行信息,传入格式:@{@"0" : @"3"}意味着第一行创建3个格子
 */
- (void)wzb_drawListWithRect:(CGRect)rect line:(NSInteger)line columns:(NSInteger)columns datas:(NSArray *)datas lineInfo:(NSDictionary *)lineInfo;

/**
 * 创建一个表格
 * line:列数
 * columns:行数
 * data:数据
 * colorInfo:颜色信息,传入格式:@{@"0" : [UIColor redColor]}意味着第一个格子文字将会变成红色
 */
- (void)wzb_drawListWithRect:(CGRect)rect line:(NSInteger)line columns:(NSInteger)columns datas:(NSArray *)datas colorInfo:(NSDictionary *)colorInfo;
/**
 * 创建一个表格
 * line:列数
 * columns:行数
 * data:数据
 * colorInfo:颜色信息,传入格式:@{@"0" : [UIColor redColor]}意味着第一个格子文字将会变成红色
 * lineInfo:行信息,传入格式:@{@"0" : @"3"}意味着第一行创建3个格子
 */
- (void)wzb_drawListWithRect:(CGRect)rect line:(NSInteger)line columns:(NSInteger)columns datas:(NSArray *)datas colorInfo:(NSDictionary *)colorInfo lineInfo:(NSDictionary *)lineInfo;
/**
 * 创建一个表格
 * line:列数
 * columns:行数
 * data:数据
 * colorInfo:颜色信息,传入格式:@{@"0" : [UIColor redColor]}意味着第一个格子文字将会变成红色
 * lineInfo:行信息,传入格式:@{@"0" : @"3"}意味着第一行创建3个格子
 * backgroundColorInfo:行信息,传入格式:@{@"0" : [UIColor redColor]}意味着第一个格子背景颜色变成红色
 */
- (void)wzb_drawListWithRect:(CGRect)rect line:(NSInteger)line columns:(NSInteger)columns datas:(NSArray *)datas colorInfo:(NSDictionary *)colorInfo lineInfo:(NSDictionary *)lineInfo backgroundColorInfo:(NSDictionary *)backgroundColorInfo;
/**
 * 获取第index个格子的label
 */
- (UILabel *)getLabelWithIndex:(NSInteger)index;

/**
 * 画一条线
 * frame: 线的frame
 * color:线的颜色
 * lineWidth:线宽
 */
- (void)wzb_drawLineWithFrame:(CGRect)frame lineType:(WZBLineType)lineType color:(UIColor *)color lineWidth:(CGFloat)lineWidth;
.h文件中提供了这些方法,用法看注释即可,getLabelWithIndex:方法是得到第index个格子,比如你有10个格子,[view getLabelWithIndex:0];是得到第一个格子,可以对其进行任何操作,比如我在第三个表格中拿到右边三个label,添加单击手势进行跳转
#####3、实现大致原理:
/**
 * 创建一个表格
 * line:列数
 * columns:行数
 * data:数据
 * colorInfo:颜色信息,传入格式:@{@"0" : [UIColor redColor]}意味着第一个格子文字将会变成红色
 * lineInfo:行信息,传入格式:@{@"0" : @"3"}意味着第一行创建3个格子
 * backgroundColorInfo:行信息,传入格式:@{@"0" : [UIColor redColor]}意味着第一个格子背景颜色变成红色
 */
- (void)wzb_drawListWithRect:(CGRect)rect line:(NSInteger)line columns:(NSInteger)columns datas:(NSArray *)datas colorInfo:(NSDictionary *)colorInfo lineInfo:(NSDictionary *)lineInfo backgroundColorInfo:(NSDictionary *)backgroundColorInfo {
    NSInteger index = 0;
    CGFloat x = rect.origin.x;
    CGFloat y = rect.origin.y;
    CGFloat h = (1.0) * rect.size.height / columns;
    NSInteger newLine = 0;
    for (NSInteger i = 0; i < columns; i++) {

        // 判断合并单元格
        if (lineInfo) {
            for (NSInteger a = 0; a < lineInfo.allKeys.count; a++) {

                // 新的列数
                NSInteger newColumn = [lineInfo.allKeys[a] integerValue];
                if (i == newColumn) {
                    newLine = [lineInfo[lineInfo.allKeys[a]] integerValue];
                } else {
                    newLine = line;
                }
            }
        } else {
            newLine = line;
        }


        for (NSInteger j = 0; j < newLine; j++) {

            // 线宽
            CGFloat w = (1.0) * rect.size.width / newLine;
            CGRect frame = (CGRect){x + w * j, y + h * i, w, h};

            // 画线
            [self wzb_drawRectWithRect:frame];

            // 创建label
            UILabel *label = [[UILabel alloc] initWithFrame:frame];

            // 文字居中
            label.textAlignment = NSTextAlignmentCenter;
            [self addSubview:label];

            // 判断文字颜色
            UIColor *textColor = [colorInfo objectForKey:[NSString stringWithFormat:@"%zd", index]];
            if (!textColor) {
                textColor = [UIColor grayColor];
            }
            label.textColor = textColor;

            // 判断背景颜色
            UIColor *backgroundColor = [backgroundColorInfo objectForKey:[NSString stringWithFormat:@"%zd", index]];
            if (!backgroundColor) {
                backgroundColor = [UIColor clearColor];
            }
            label.backgroundColor = backgroundColor;

            // 字体大小
            label.font = [UIFont systemFontOfSize:13];

            // label文字
            label.text = datas[index];

            // label的tag值
            label.tag = WZBTag + index;
            index++;
        }
    }
}
这是核心代码,其中做了合并单元格、文字颜色、背景颜色、等判断。画线是用的贝塞尔曲线和CAShapeLayer,代码在下边,每个单元格里都创建了label显示文字。我还提供了方法画一条直线,相信项目中很多页面某些位置需要画一条直线,
- (void)wzb_drawLineWithFrame:(CGRect)frame lineType:(WZBLineType)lineType color:(UIColor *)color lineWidth:(CGFloat)lineWidth这个方法能够很方便的实现这一需求
- (void)wzb_drawLineWithFrame:(CGRect)frame lineType:(WZBLineType)lineType color:(UIColor *)color lineWidth:(CGFloat)lineWidth {

    // 创建贝塞尔曲线
    UIBezierPath *linePath = [[UIBezierPath alloc] init];

    // 线宽
    linePath.lineWidth = lineWidth;

    // 起点
    [linePath moveToPoint:CGPointMake(0, 0)];

    // 重点:判断是水平方向还是垂直方向
    [linePath addLineToPoint: lineType == WZBLineHorizontal ? CGPointMake(frame.size.width, 0) : CGPointMake(0, frame.size.height)];

    // 创建CAShapeLayer
    CAShapeLayer *lineLayer = [CAShapeLayer layer];

    // 颜色
    lineLayer.strokeColor = color.CGColor;
    // 宽度
    lineLayer.lineWidth = lineWidth;

    // frame
    lineLayer.frame = frame;

    // 路径
    lineLayer.path = linePath.CGPath;

    // 添加到layer上
    [self.layer addSublayer:lineLayer];
}
下边画了一下随机颜色的线条,最终效果是这样:
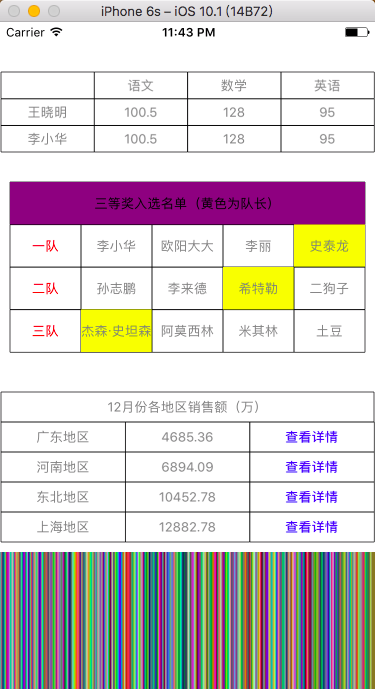
怎么样,您学会使用了吗?
您还可以加入我们的群,大家庭期待您的加入!